Do you have a main water shut-off valve inside your house? It’s a code requirement, so you probably do. But if for some reason you don’t have one, I recommend getting one installed. It makes it easy to shut off the water to repair or replace toilet valves, washer hoses, sink faucets and supply lines, etc.
Mine looks like this. I access it from a trap door in a closet.
Do you turn off the main shut-off when you go on vacation? I recommend it. It’s peace of mind that you won’t come home to a flooded house if a washer hose bursts, pipes freeze or some other unplanned catastrophe occurs.
Can you easily access your main shut-off valve, or is it behind a locked door, accessible only by ladder, or otherwise barricaded by stuff? If so, I recommend clearing a path and making it quickly accessible. That way, if there is a water emergency, such as a burst pipe or hose, you can quickly stop the flow.
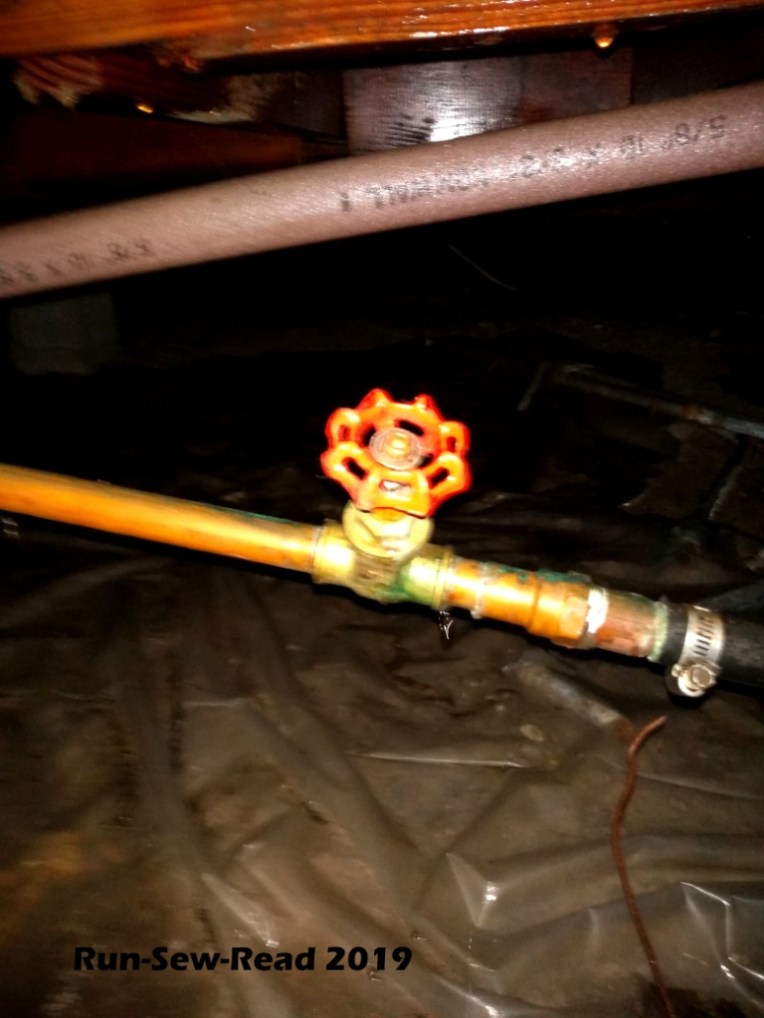
The next important question is: Is your main shut-off valve this type?
If so, I recommend replacing it, and here’s why. It will break.
Recently, I turned the water off at the shut-off, so I could replace a toilet valve. With the toilet valve easily replaced, I re-opened the shut-off valve. Unexpectedly, the shut-off valve handle came off in my hand, and water started pouring into the space under my house.
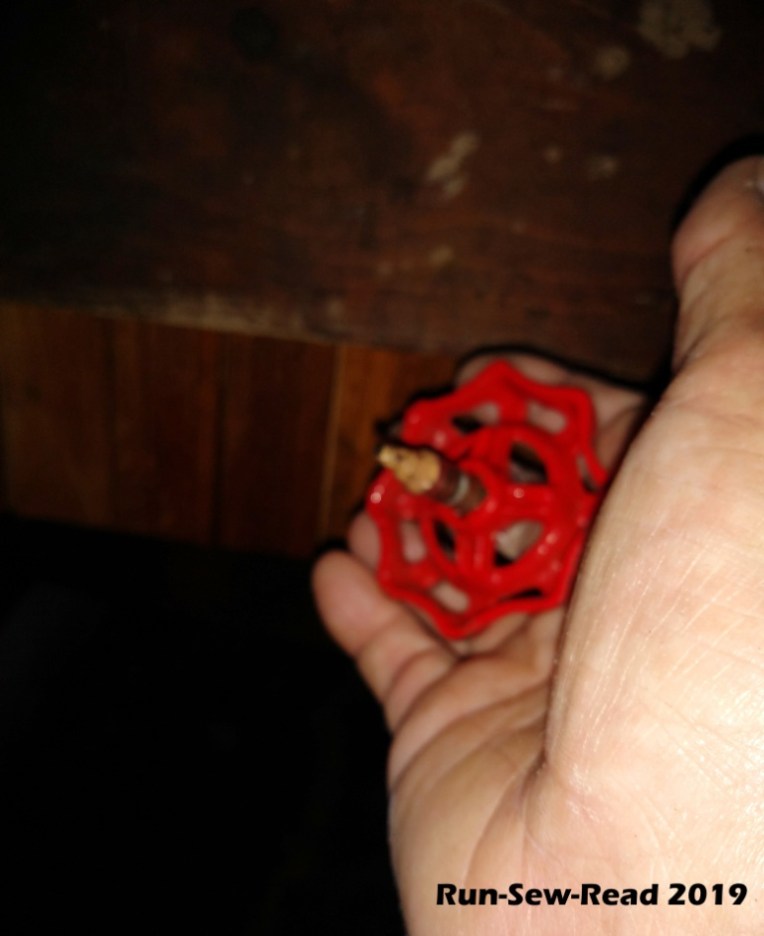
Miraculously, I got the handle back on and the valve closed. Murphy’s Law dictated that this would happen on a Sunday afternoon. No plumbers were available. I went all night without running water, worrying that the shut-off would fail. Thankfully it didn’t. The plumber got here first thing in the morning and replaced the valve. He replaced it with a quarter-turn ball valve.
This is the type of shut-off I had always wanted, but didn’t realize I should have gone ahead and gotten the replacement. The total cost was $150. The plumber rolled his eyes at the round handle type and said “they all fail”.
With the quarter-turn ball valve, my peace of mind is restored. If I want to replace a faucet, or go on vacation, a simple turn of the shut-off valve is all it takes to turn the water off to the entire house.
Not all water can be so easily turned off. I’m speaking of all of the rain we are getting here in the Arkansas River region. Our banks, reservoirs and ditches are full, and we are sending the excess on to Oklahoma and Arkansas. Sorry ’bout that, neighbors to the south.
Bridges are still doing okay in my area, but some streets and paths, not so much. Parts of our river bike/walk path has been submerged. When the water recedes, in some spots the path has washed away with it.
‘Some’ are enjoying it. Others like me are spending a lot of extra effort on cleanup. Sigh.
The fantastic Victoria and Albert Museum in London is hosting a Mary Quant exhibit this year. With it they’re putting on workshops and special events. If like me, you can’t get to London this year, there’s this! The museum has commissioned a dress pattern to be designed in the style of Mary Quant. It’s now available here, with written and video instructions and tutorial:
This easy-to-use sewing pattern has been designed exclusively for us by Alice & CoPatterns. The design includes two neckline options, two pocket options, three collar finishes, and two sleeve finishes – all inspired by Mary Quant’s iconic designs. It’s a classic A-line mini which sits just above the knee – you can shorten it if you want to show a bit more thigh, or lengthen to turn it into a more 70s style maxi-dress.
There’s a lot of conversation about measles these days, in the US anyway. Here’s my story….
I got miserably sick with fever, and then a rash started showing up. Mom took me to the doctor. The bewildering diagnosis was measles. It was bewildering because–
No one gets measles (or so I thought); and
As a child, I had been vaccinated against measles. My immunization records confirmed it.
The assumption was made that the vaccine failed, or the pediatrician’s staff had noted the immunization in my records but forgot to actually administer the vaccine.
It was the most miserable I’ve ever been in my life, and scary.
There were the typical symptoms of being sick–Achy and miserable all over, nose, throat and relentless cough; no energy for anything but bed rest.
Itchy, burning rash–The rash covered my entire body, and itched and burned like mad, day and night.
High Fever—persistent, deadly high temperatures.
Ice baths–The high fever had to be controlled with intermittent freezing cold ice baths.
Night sweats–I learned to love them, because it meant the fever was breaking, or something like that. Confession: I still love night sweats to this day, because I remember the relief it brought.
The misery lasted about a month, with 2+ weeks being absolute round-the-clock hell.
The rash made me really ugly.
The rash was thick, soft and red, and covered my entire body; face, arms, legs, and torso. Visualize the worse case of acne, chicken pox and poison ivy ever seen, and then fill in any open spaces with more rash.
My dad teased me about how bad I looked and asked if I was going on a date. (Yeah, thanks, Dad. :p )
The rash didn’t disappear when the other symptoms finally did. It was basically a massive number of sores that took their own time to heal.
Even after the sores healed, the rash left dark, blotchy shadows on my face and body, under the skin. It took weeks and weeks for the shadows to fade away gradually.
I could have infected lots of other people because I didn’t know I had a highly-contagious, potentially deadly virus.
The 16-year-old me did all of these things on a regular basis:
Worked at a fast food restaurant
Went to school every day
Went shopping (tried on clothing, shoes and jewelry, and tested makeup)
Went swimming with friends
Hung out at friends’ homes
Ate at restaurants
Dated boys (and kissed them)
Cared for my toddler brother at home (feeding, dressing, child’s play, etc.)
My mom was pregnant at the time with our baby brother, or she got pregnant soon after that.
Who knows where I came in contact with the measles virus, but the list above indicates it could have been anywhere. Kids and teenagers are constantly in contact with the world.
From the Mayo Clinic on how measles is spread:
Measles is a highly contagious illness caused by a virus that replicates in the nose and throat of an infected child or adult.
When someone with measles coughs, sneezes or talks, infected droplets spray into the air, where other people can inhale them.
The infected droplets may also land on a surface, where they remain active and contagious for several hours.
You can contract the virus by putting your fingers in your mouth or nose or rubbing your eyes after touching the infected surface.
About 90 percent of susceptible people who are exposed to someone with the virus will be infected.
When I finally healed, it was complete. I was lucky. Some common complications from measles are dangerous and/or permanent.
From the Mayo website on common complications from measles:
Ear problems. One of the most common complications of measles is a bacterial ear infection. Permanent hearing impairment can result.
Bronchitis, laryngitis or croup. Measles may lead to inflammation of your voice box (larynx) or inflammation of the inner walls that line the main air passageways of your lungs (bronchial tubes).
Pneumonia. Pneumonia is a common complication of measles. People with compromised immune systems can develop an especially dangerous variety of pneumonia that is sometimes fatal.
Encephalitis. About 1 in 1,000 people with measles develops a complication called encephalitis. Encephalitis may occur right after measles, or it might not occur until months later.
Pregnancy problems. If you’re pregnant, you need to take special care to avoid measles because the disease can cause preterm labor, low birth weight and maternal death
Did I mention having measles was the most miserable I’ve ever been in my life? It was. Scary, too. I don’t want to ever feel like that again. I wouldn’t wish it on anyone.
Can I get measles again? I asked my doc that this week, and the answer was “maybe”. My choices are to get a test to see if I have the antibodies, or skip the test and go ahead and get the vaccine. I’ve decided to get the test first, mainly to satisfy my curiosity. Stay tuned….
Finished tote dimensions are approximately 12″ x 6″ x 6″
Start with these pieces of sturdy fabric:
Bag 19″ x 11″ (cut 2)
Handles 15″ x 4″ (cut 2)
Center divider 7″ x 12″ (cut 1)
General Construction Steps:
Fold each handle strip the long way, right sides together, and sew lengthwise with a 1/4″ seam, to make a tube. Turn right side out and press flat.
Fold center divider in half right sides together, to make a 7″ (h) x 6″ (w ) piece. Sew two of the open sides with a 1/4″ seam. Turn right side out, press and sew the open end shut.
Sew one of the side seams on the bag. Reinforce with an extra row of stitching. (I used French seams.) Hem the top edge.
Then finish and attach the handles; centered on each side.
Center the divider on one side of the bag and stitch it in place along one edge of the divider.
Your piece will now look something like this. This view is the ‘inside’ of the bag laid out flat:
A closer view of the measurements:
Sew the other side seam and the bottom seam of the bag. Reinforce both seams with an extra line of stitching or your preferred reinforcing method.
Your bag will now look something like this, turned inside out
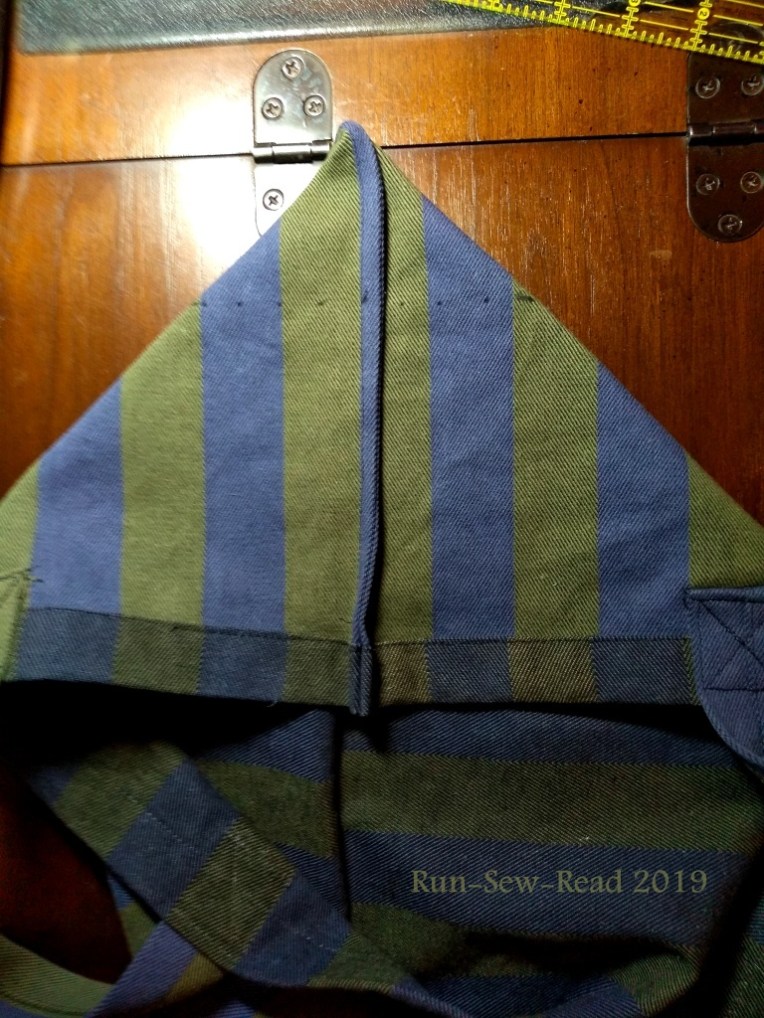
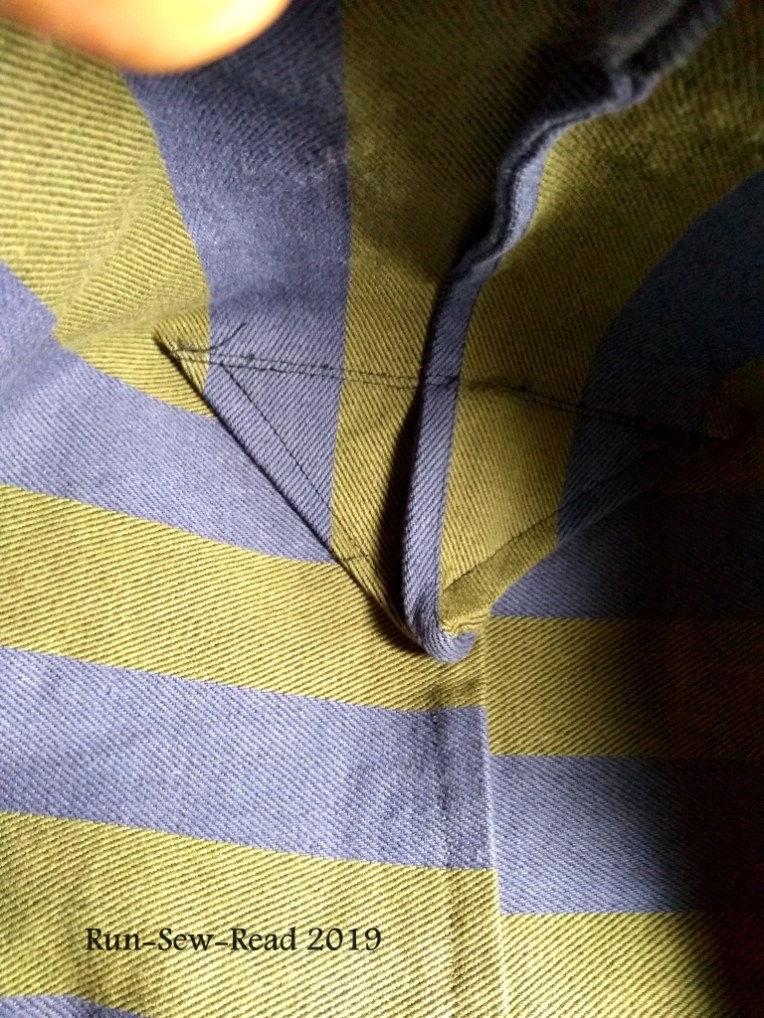
Measure and mark for mitering the bag corners. The miter seam should be 5 1/2″ long (2 1/4″ from the center line.)
The stitching line marked:
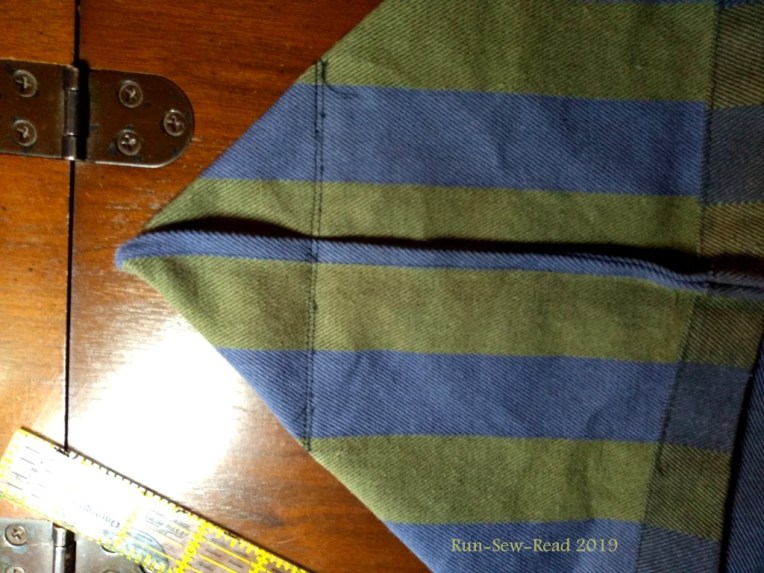
The miter is stitched and then reinforced with a second row of stitching.
Turn the bag right side out, and tack the mitered corner in place.
Then repeat the steps for mitering the other corner.
And now finally, pin the other side of the center divider in place down the center of the other side of the bag.
Stitch the divider in place. (It will be awkward, sewing from inside the bag, but thankfully it’s just the one short seam.)
The bag is finished!
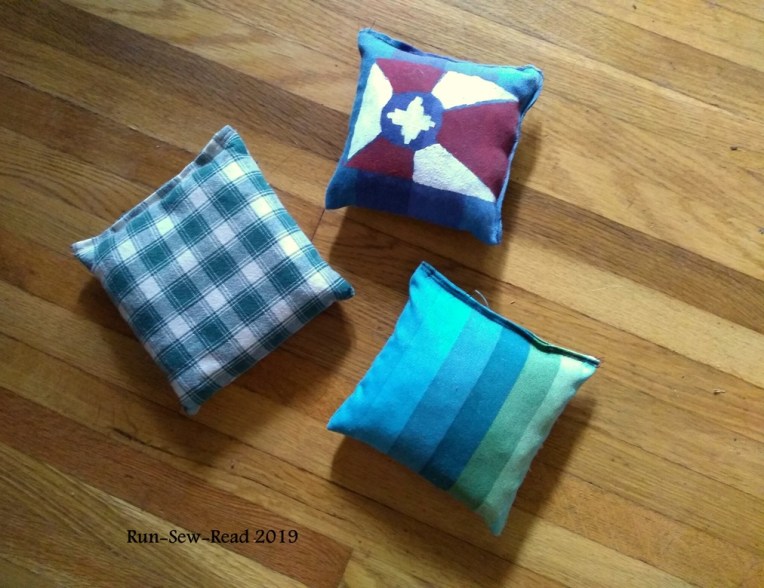
Options for personalizing your bean bag tote are endless. Here’s a colorful bag made from a placemat and some scraps.
Here’s one I made out of the bag the corn came in. Who could resist using a ‘whole corn’ bag to make a ‘corn hole’ bag. I know, *groan*!
Yay, the season of outdoor get-togethers and yard games is upon us! (Memorial Day, Fourth of July, Labor Day, and more.) For my family, it started with Mother’s Day, when all of us sibs converged on Mom’s house for the weekend. One of my jobs was to bring bean bags for the Cornhole game. My brother made nice wood Cornhole boards, and I made a new set of bean bags.
Cornhole is a totally awesome game for tailgaters, festival goers, and family get-togethers. It is a bean bag toss where you try to toss the bag through the hole in a board 20+ feet away.
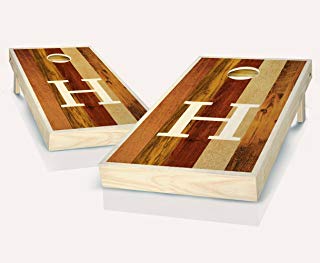
The boards can be purchased or custom made. Boards can have really lovely designs. Here is a monogrammed set available on Amazon.
The popularity of the game is evident from the range of products available on Amazon.
A set of Cornhole bags is eight (8) bags–4 in one color, and 4 in a different, contrasting color.
The bean bags are square, made of cotton duck, or similar heavy duty fabric, and filled with feed corn or a synthetic material that resembles corn in weight and consistency.
Each finished bag should be 6 inches x 6 inches, and weigh 16 ounces when filled.
The internet has numerous tutorials on making Cornhole bean bags. Do a search on Google and YouTube, and you’ll find some excellent instructions.
So, this post is less a tutorial, and more a compilation of tips I’ve picked up from making the bags.
Constructing the bags:
Start with 7″-7.5″ fabric squares. You’ll need 16 squares for 8 bean bags. Err on the side of cutting the squares larger, not smaller:
Stack two squares, right-sides together and sew all sides with a 1/2 inch seam allowance, leaving a minimum 3-inch opening on one side, for adding the corn.
[Stitching lines and opening:]
Reinforce the seams! Reinforce by adding a second row of stitching in the seam allowance. Then zig-zag or overlock the edges for even more reinforcement.
[Alternatively, reinforce by sewing the edges with French Seams. Tutorial here. ]
Then turn the bags right side out and get ready to fill them.
Filling the bags…
Whole corn for the filler can be purchased at a farm store or feed store. The price is usually less than $10 for a 40-50 lb bag of corn. I buy it at this regional store. https://www.atwoods.com/atwoods-whole-corn-40-lbs.html
Freeze the corn for 24-48 hours, to kill any little bugs and things that might be waiting to come out.
Before weighing, sift the corn through a colander to eliminate as much of the corn dust and other ‘stuff’ as you can. Then measure out 15 – 15.5 ounces of corn for each bag. The other .5 oz or so will come from the weight of the fabric.
With a funnel, load the measured corn into the bag.
A funnel made from a plastic gallon container works well because it has a big enough opening for the corn to pass through. A standard kitchen funnel doesn’t have a big enough opening.
To close off the bag, push the corn down in the bag as far as it will go, and then secure it there with pins or a long needle. For this, I prefer to use a long ‘doll needle’. The 5″ needle is easy to insert, and the one long needle holds everything in place. (Actually, a doll needle comes in handy for so many things, that I recommend keeping one in the sewing kit.)
The picture below shows how the doll needle holds the corn back from the stitching area, to give you room to maneuver the open end of the bag under the presser foot.
That little bit of extra room in the top of the bag is important not just for room to sew, but also for the finished bag. Bags stuffed too tight with corn can potentially burst on impact.
⇒Remember to reinforcetheclosure with a second row of stitching, and maybe even a third row.
Get creative with the bags! Try patterns and fabric paints.
Then, you are ready to play!
The bags (and extra corn) should be stored in a rodent-proof container.
Additional tips on bags and peace brought to you by John Lennon of Bag.
It was a drag, rolling out dough to fit my baking sheets. The sheets are ‘jelly roll’ style, which means they are rimmed with a raised edge. A regular rolling pin is too big to fit within the pan. My option was to treat it like pastry dough; i.e., roll the dough out on the counter and measure it to fit the sheet, then carefully lift the dough and place it in the sheet; or press the dough into the sheet with my fingers and then roll it with whatever cylindrical gadget I could find to fit the pan.
Some of the gadgets I’ve tried; none of which worked out very well:
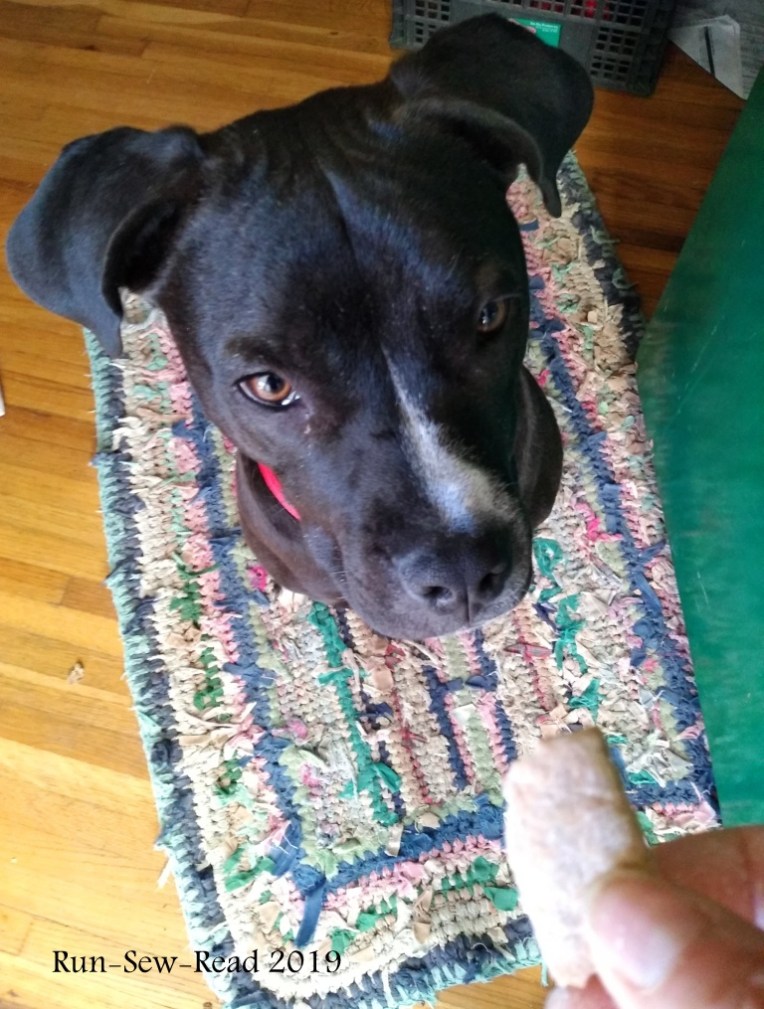
Myrtle-the-pup loves homemade dog treats, and I enjoy making them. So this issue of rolling out the dough was becoming an all-too-frequent annoyance.
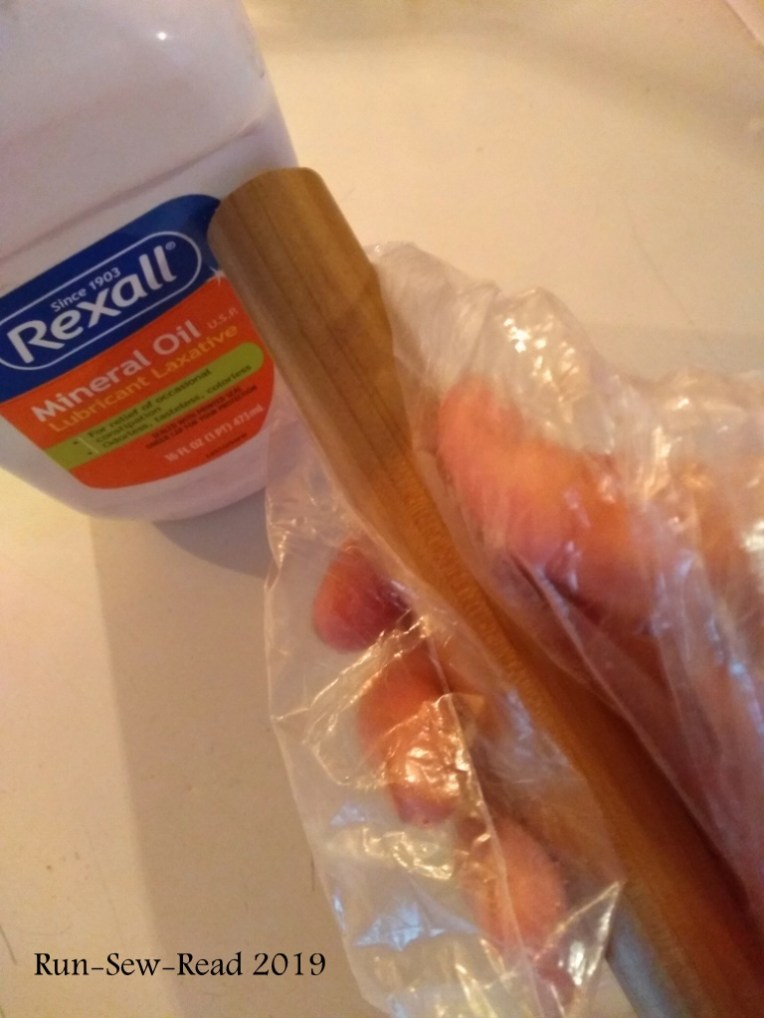
The solution: I bought a 1.25-inch diameter wood dowel from the craft aisle of the store. It was $1.50. They are sold in 3-foot lengths. At home, with a little saw, I measured and cut a piece to the width of my baking sheet. Then washed the new little ‘rolling pin’ and coated it with mineral oil.
Now, a batch of dough goes from this…
to this…
to this with ease!
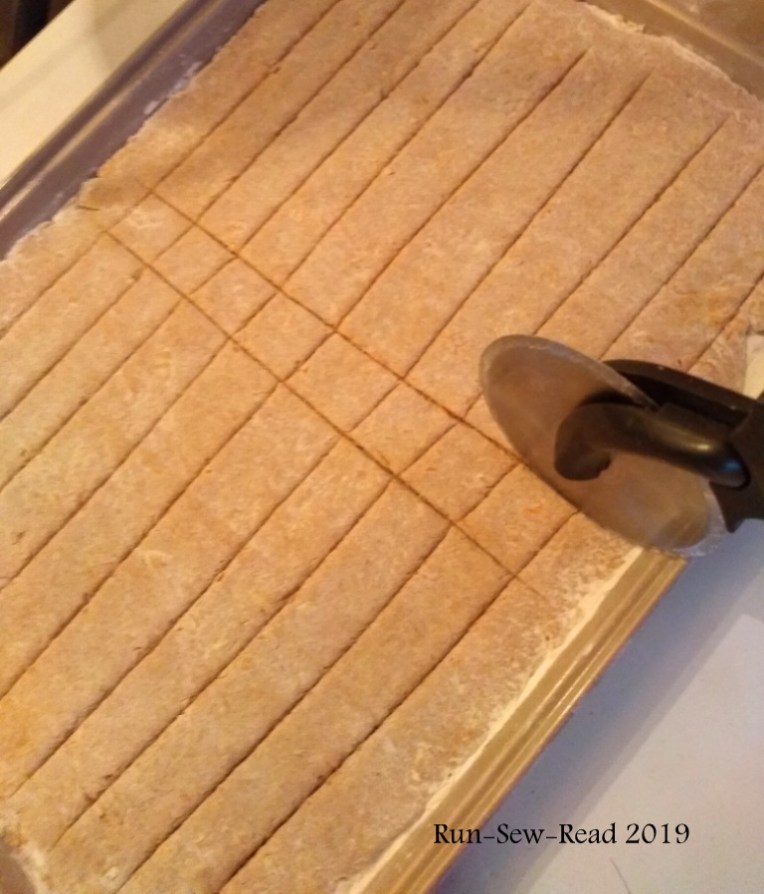
For Myrtle’s treats, I score the dough before baking, to be broken into little squares later. A pizza cutter works great for this.
Don’t make the scoring tedious. The pieces don’t have to be uniform in size or shape.
(Yes, I have a dog bone-shaped cookie cutter. But using it is a slow, tedious process. I do use it for special gifts for Myrtle’s dog friends and cousins, but that’s all.)
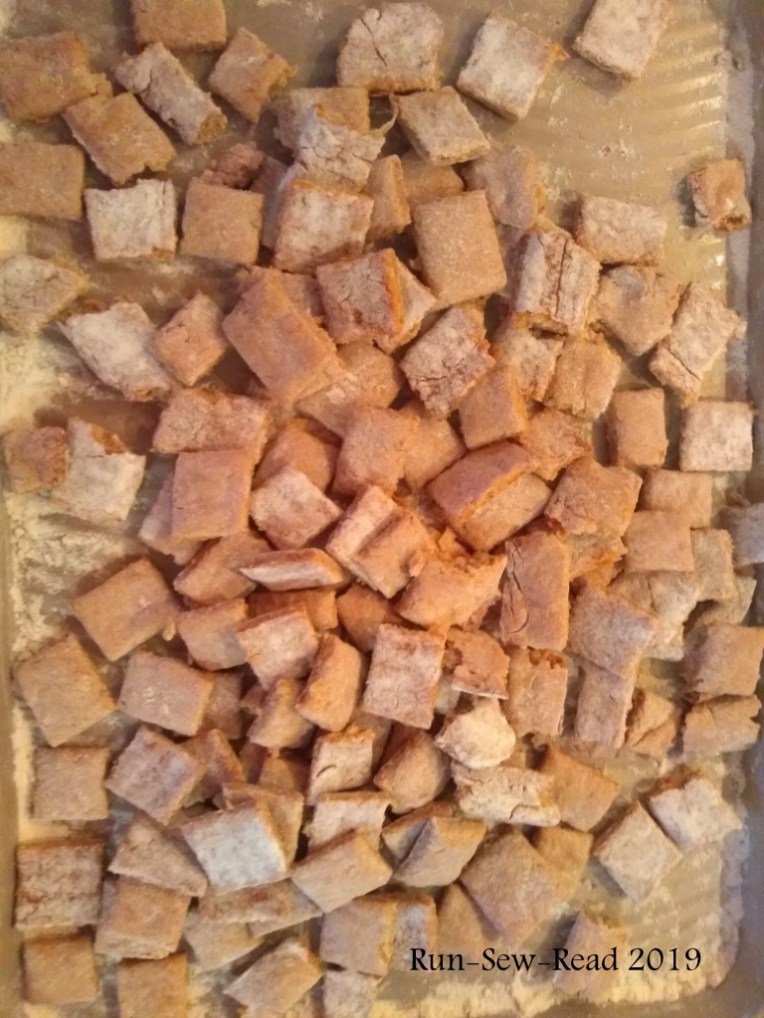
After baking, the treats come out of the oven looking like this.
After cooling, it only takes a minute or two to break them all up.
I store the treats in an old Parmesan shaker, for easy dispensing.
The dog treat recipe I used for this batch is the Apple-Carrot Treats from this page:
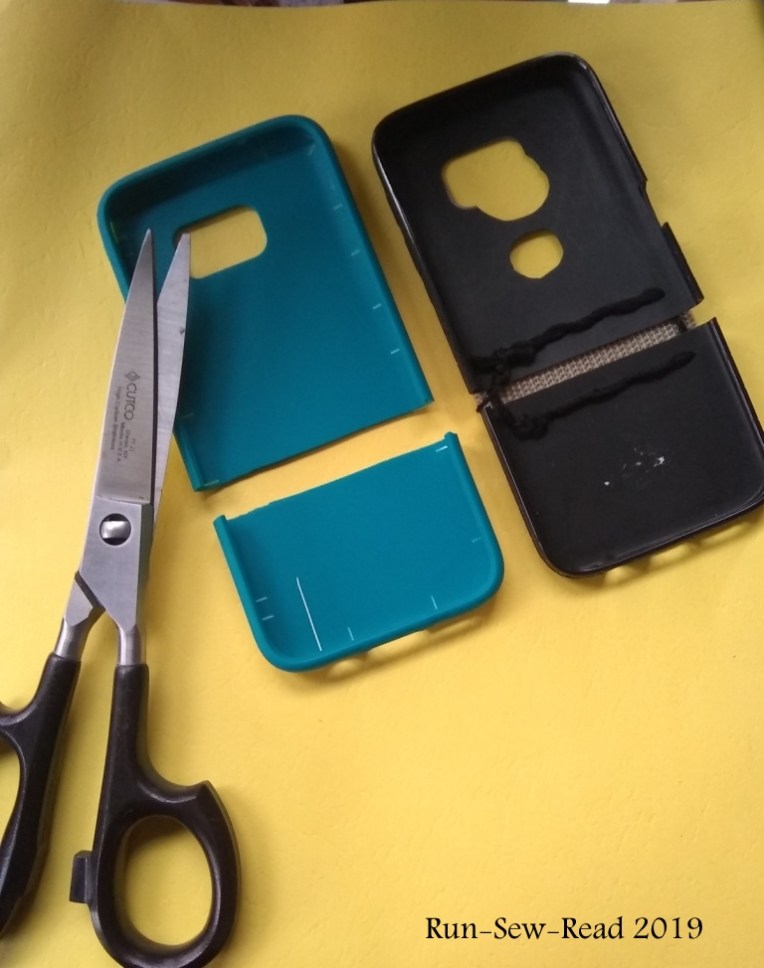
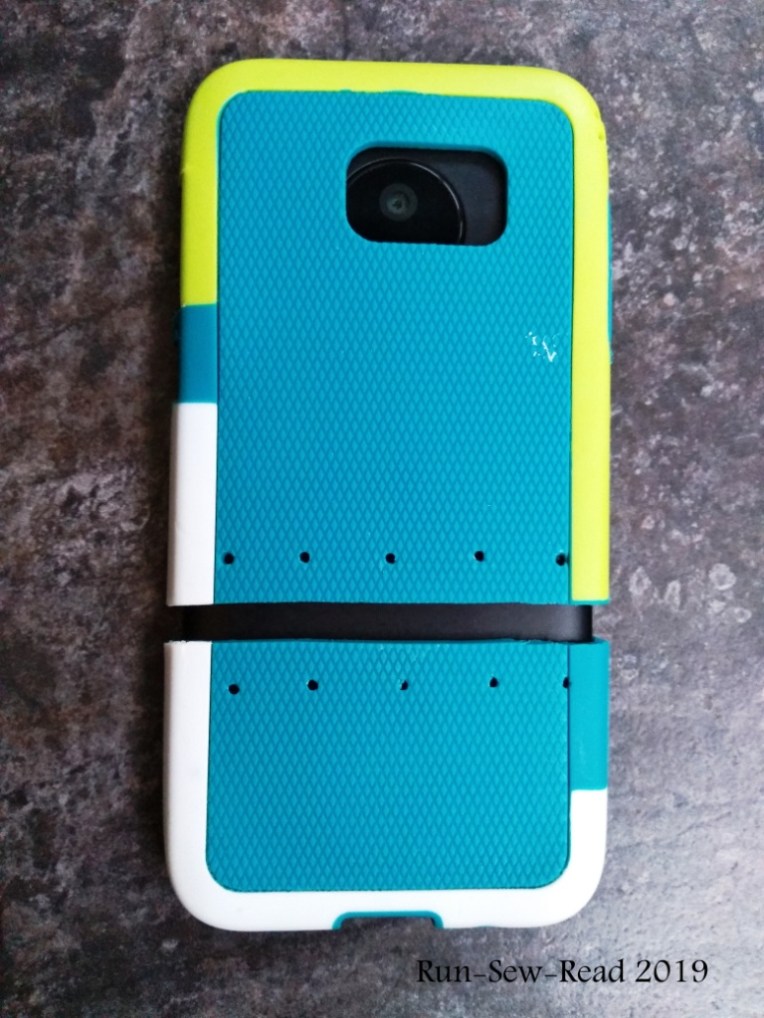
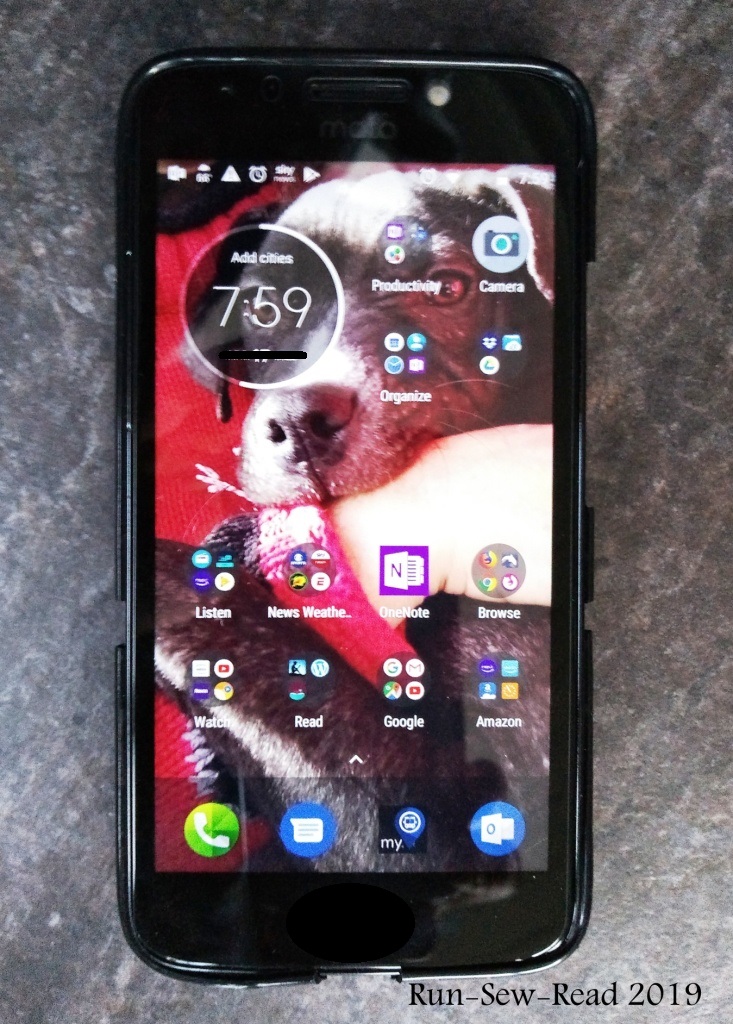
Last month I ordered a new phone and case. When they arrived, the case didn’t fit the phone. Dollar Store to the rescue. At the Dollar Store, I found some cases that were the correct width, but too short. They were flexible material, so I decided to try cutting one to make it fit. I bought two, in case I messed one up. Here’s how the process went.
Cut the case in two, to increase the length. The case is a rubbery material, so strong shears are needed. I used kitchen shears. (The picture below shows the finished black case on the right, and next to it the turquoise one in progress.)
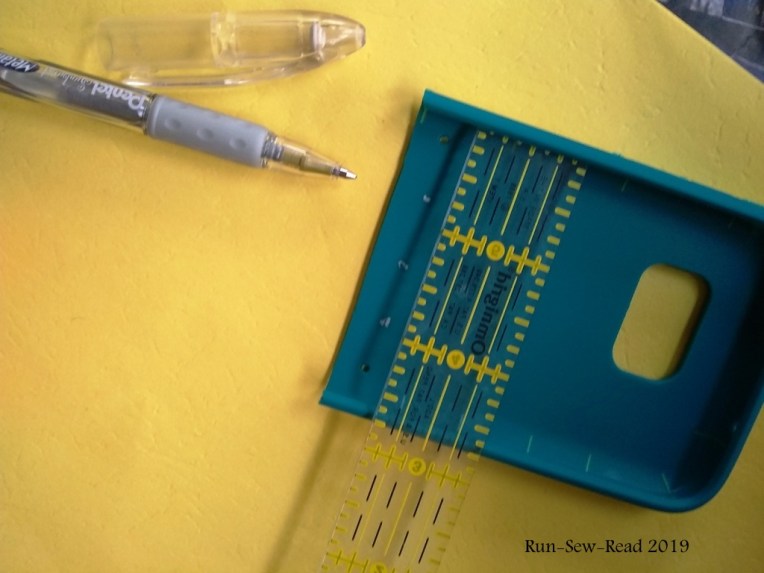
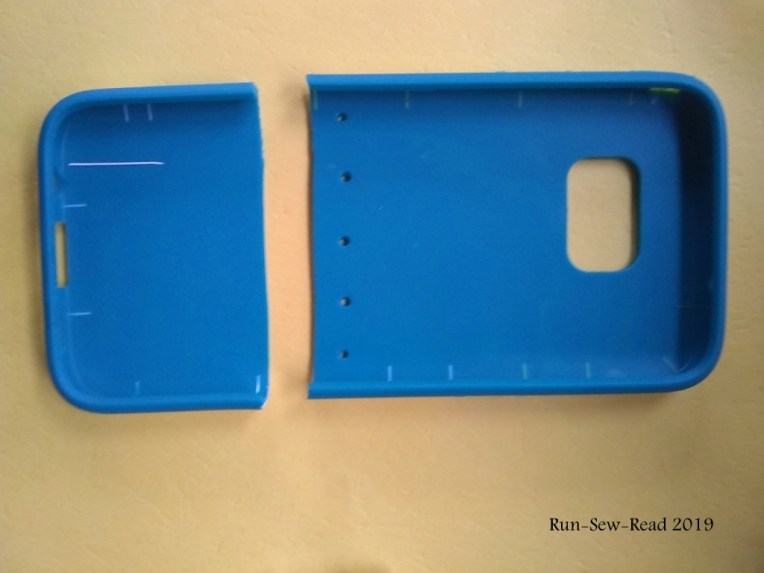
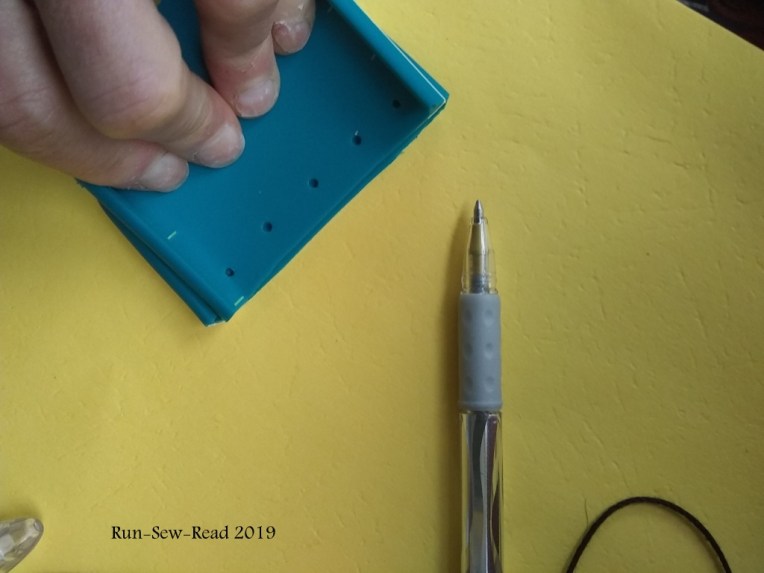
This shows the additional length needed to fit over the phone. Next I punched holes in both pieces, to stitch in a piece of fabric to bridge the gap.
Marking and punching the holes:
The locations of the holes were first measured and marked, using a simple ruler and gel pen.
A leather punch worked great for punching the holes. My leather punch isn’t the exact one pictured, but is substantially similar. It was $7 well spent. I use the punch all the time for making belts fit, and numerous other ‘hacks’. Click the picture to go to the punch on Amazon.
When one side was punched…
I used those holes to mark where to punch on the corresponding piece.
Then, using cotton yarn and a darning needle, I stitched a scrap of woven belting to each side, to bridge the gap. Almost any durable fabric could be used. Think denim, duck canvas, vinyl, etc. Just make sure the edges are bound to prevent raveling.
Using the kitchen shears again, I adapted the back holes for the photo lens and sensor. This first attempted adaptation wasn’t very pretty, but it did its job.
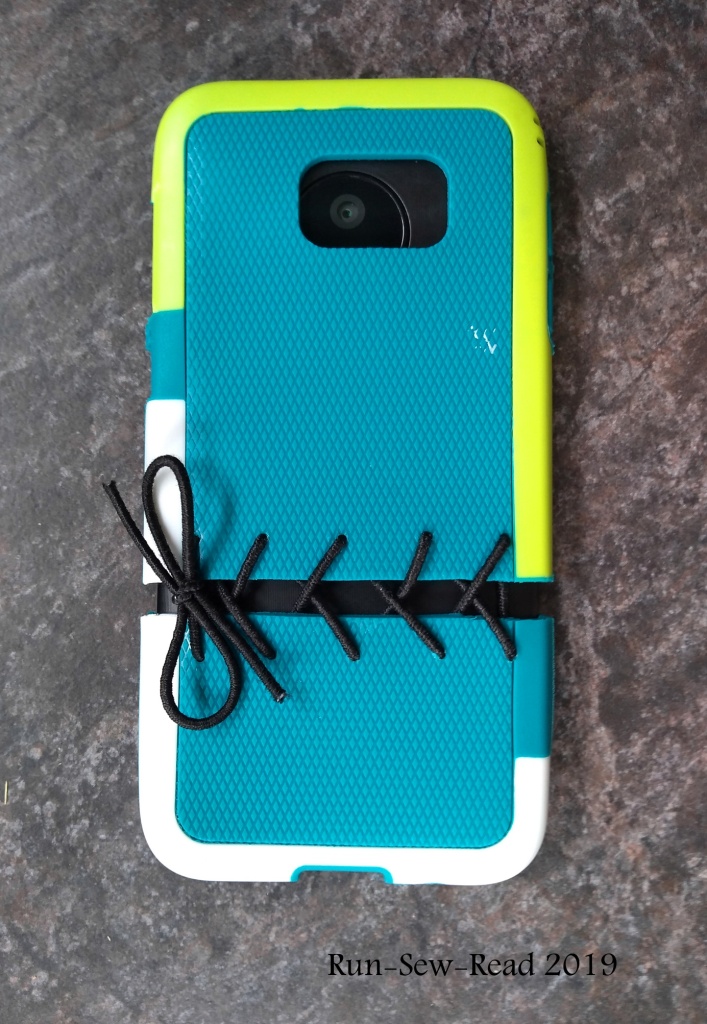
On the other case, I omitted the fabric, and simply laced the two pieces together with elastic cord.
The cord lacing fits as well as the fabric piece. It was easier to do, and came out looking a lot nicer than the fabric, I think.
Here’s a side view. With the kitchen shears, I modified the side cutouts to match the control buttons on the phone.
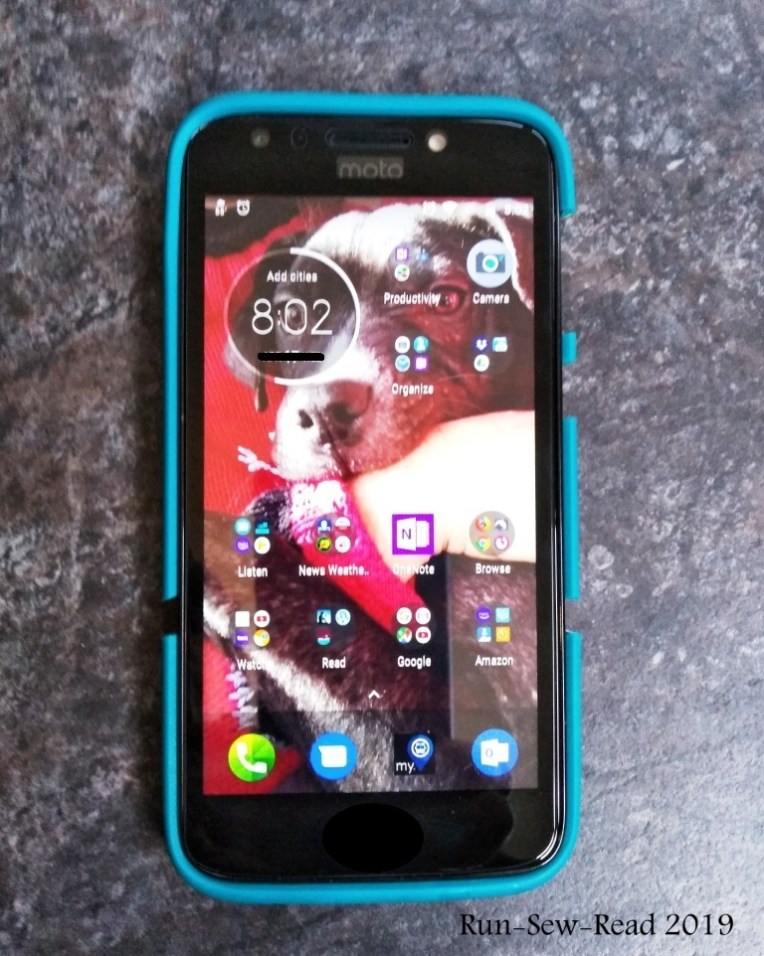
From the front, the cases look like this.
The verdict:
The DIY cases worked out great. They never came loose from the phone, and they did their job of protecting the phone while I ordered another case that was supposed to fit the phone. When that case didn’t fit, I ordered a third case. After three failed attempts to get a proper case, I gave up. There were other issues with the phone too, so the phone was returned, and I ordered a different phone and case. The DIY Dollar Store cases got me through while waiting for the ‘right’ phone and case to arrive, and they would have lasted a long time, if I’d kept that phone.
Have a lovely Easter. We sang this in church on Easter morning when I was little.
They say it started more than 500 years ago, when on Shrove Tuesday (the day before the start of Lent), a housewife in England was cooking at her stove, heard the bell for church, and dashed from her house to the church still wearing her apron and carrying her skillet.
Today it is an annual international women’s race, in which the participants wear a housedress, headscarf and apron, and must carry a skillet with a pancake in it, and flip the pancake.
The event takes place in Olney, England and Liberal, Kansas USA. Each town holds a race, and the fastest finish time wins the international contest.
(Picture from Olney’s website)
A multi-day festival has grown up around the event. Each town maintains a Pancake Day website; and each maintains a Facebook page, which is great for enthusiasts like me who want real-time updates on race day.
This totally awesome Olney poster was designed by one of its middle school students: (Click the poster to go to the Olney page for more info on the poster.)
How the International Pancake Day Race came about:
Each of the two cities’ websites gives a brief history of the Pancake Day Race. Since each site provides a fact or two that the other one doesn’t, I’ve included both. But hey, the best thing to do is visit both websites for more history and photos of past events.
From the Liberal, KS site:
“In Olney, England, the Pancake Race tradition dates back more than 500 years to 1445. A woman engrossed in using up cooking fats (forbidden during Lent) was making pancakes. Hearing the church bells ring calling everyone to the shriving service, she grabbed her head scarf (required in church) and ran to the church, skillet and pancake in hand and still apron-clad. In following years, neighbors got into the act and it became a race to see who could reach the church first and collect a “Kiss of Peace” from the verger (bell-ringer.)
“HOW DID PANCAKE DAY GET STARTED IN THE UNITED STATES?
“It all started in 1950 from a magazine picture of the Olney women racing each other to the church. Liberal Jaycee President R.J. Leete contacted the Rev. Ronald Collins, Vicar of St. Peter and St. Paul’s church in Olney, challenging their women to race against women of Liberal. Like in Olney, the traditional prize of the race is the “Kiss of Peace” from the verger (bellringer).”
From the Olney, UK site:
“No one is quite certain how the world famous Pancake Race at Olney originated. One story tells of a harassed housewife, hearing the shriving bell, dashing to the Church still clutching her frying pan containing a pancake. Another tells that the gift of pancakes may have been a bribe to the Ringer, or Sexton that he might ring the bell sooner; for ringing the bell signalled the beginning of the day’s holiday and enjoyment, no less than to summon the people to the service at which they would be shriven of their sins before the long Lenten feast.
“Tradition declares that the race was first run in the year 1445, pancakes at the time being a popular dish, receiving royal favour. It was run on Shrove Tuesday, the day before Lent, and the whole day was given over to a festival of celebration, pranks and pastimes. It is not known where the original start line was but the finish line was at the Church door.
“The race continued through the centuries, and whilst many other local customs died, and the race itself may have lapsed many times, such lapses never caused the race to be entirely forgotten by the womenfolk of Olney. It is known to have taken place during the troublesome times of The War of the Roses (1445 to 1487).
“THE CUSTOM REVIVED
“After a lapse during the Second World War, it was revived again in 1948 by the Vicar of Olney the Reverend Canon Ronald Collins. In clearing out a cupboard he came across some old photographs, which had obviously been taken in the Nineteen Twenties and Thirties of women running with frying pans. Filled with enthusiasm to revive the ancient custom, he called for volunteers, and in response thirteen runners appeared on Shrove Tuesday that year. The race immediately caught the popular imagination and people of Olney set out to enjoy this simple and colourful link with their rich past, a day of festivities.
“THE LINK WITH LIBERAL
“In 1950 the race became an International event. A challenge was received from the town of Liberal in Kansas, USA, where they had, after seeing the press photographs of the race at Olney, conceived the idea of setting up a similar custom. Olney readily accepted the challenge and, in a spirit of international goodwill and friendship, the two towns now compete annually and prizes are exchanged. The race is run on a timed basis.”
THE RACE!
At 11:55 am Olney time (5:55am Central US time), the Olney Race begins.
At 11:55 am Liberal time (5:55pm Olney UK time), the Liberal race begins.
The weather forecast for this year’s race:
Olney: Partly cloudy and 50°F with a SW wind of 17 mph, causing a feels-like temp of 45°F.
Liberal: Sunny and 29°F with a N wind of 8 mph, causing a feels-like temp of 22°F
Don’t be fooled by the dresses, aprons and skillets; these races are legit athletic contests. So, what is the actual race like? Here is a recent video from each side of the pond:
The Olney, UK race (2012)
The Liberal, KS USA race (2014)
Attending these two Pancake Day races is a bucket list item for me. It’s only a 3.5 hour drive for me to Liberal, KS, but Tuesdays pose a problem. Once again this year, work has intervened to keep me from going. Next year, Pancake Day is on Tuesday, February 25. I shall try again.
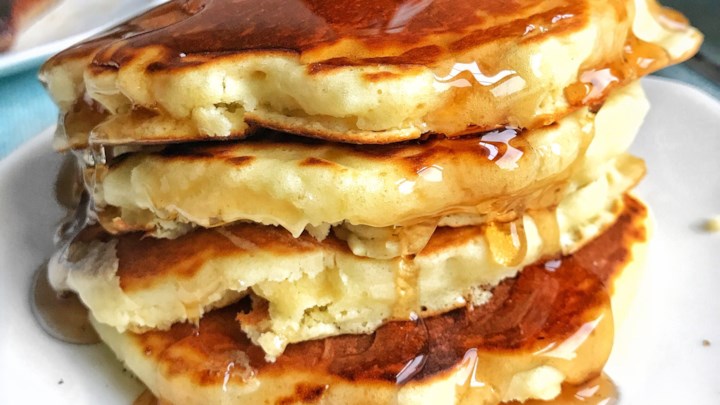
I love to eat pancakes, so pancakes must be included in this story:
American pancakes are typically thicker than English pancakes. I love both.
I love pancakes so much that on my first ever trip to England (in 2010), I took a picture of my first-ever English pancake, and the lovely, skilled vendor cook who made it for me.
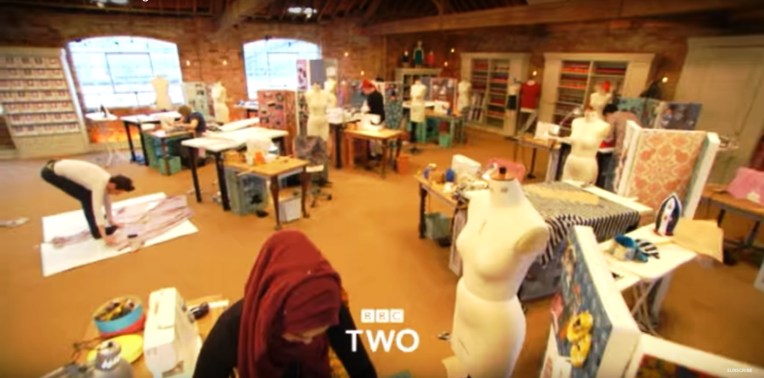
For people located in the US, like me, there are limited viewing options for this awesome BBC series, The Great British Sewing Bee. But I put up with those annoyances because I love this show so much. For a quick intro, here is the trailer for the past season–Season 4:
After an excruciatingly long wait, Season 5 premiered this month! Here is the entire hour-long Episode 1 of Season 5 on Youtube. My advice is to watch it now, because like other GBSB episodes, this quality upload will likely disappear soon from Youtube. Which also means, parts of this post will disappear.
The sewing contestants who have appeared on the GBSB are from a wide variety of backgrounds and ages. Many are self-taught. Some of the older participants have spent their lives sewing for themselves and their children.
While I’d love to have the show’s workshop and haberdashery, I would be crippled by the time pressures! How do they do it with a show host yelling at them that they are almost out of time???
As the screenshots below indicate, the contestants design and produce amazing garments in just 2 or 3 hours; sometimes less time than that.
What happens to the contestants? After their stint on the show, my impression is that most of the contestants go back to their regular lives. But at least one, Tilly Walnes, has parlayed her skill and participation on the show into a successful business. She has an inspiring website for beginners and experts alike. The patterns Tilly has designed for sale in her shop are great. I purchased her “Coco” dress pattern, and now [almost] three Coco dresses later, I’ve purchased three more of her patterns. Hopefully the new patterns will all soon become fun garments in my closet.
Coco #3 in Progress
Coco #1
Coco #2
When to watch: The GBSB episodes are broadcast weekly on BBC, on Tuesdays at 9pm UK time, which is 3pm Central time in the US. Soon after that, start checking Youtube for an uploaded episode. It may take a few hours, or days before one appears. Warning: Choose carefully among the Youtube offerings, and by that I mean steer clear of the dodgy videos that require you to click a link outside of Youtube to watch the episode.
We really need to be able to watch The Great British Sewing Bee on TV in the US! I’ve inquired with our local PBS station, and they made inquiries, and were told succinctly that it is not available in the US and may never be available here. Commence temper tantrum.
UPDATE! Here is Season 5 Episode 3, aired Tuesday, February 26, 2019.
They are doing vintage 60s-70s garments, using vintage machines and playing great background music from the period. There’s my sewing machine!
And they ventured into Punk! “Anarchy in the sewing bee!”