Hello! It’s been awhile! I didn’t mean to take such a long hiatus. I’ve had plenty of projects and things to share, but just plain got too busy to compose any posts. But this is BIG NEWS! The movie I worked on 2 summers ago has now been released! My last post was about working on the movie (my first time ever working on a movie); and the filming being abruptly put on hold due to the SAG-AFTRA strike of July 2023. All movies in progress that involved SAG–Screen Actors Guild members were ordered to stop. Thankfully, soon after the strike started, this movie got permission to resume filming; and with some adjustments, completed the filming on schedule.
So yeah, the movie has now been released, and it is getting a great early response! Here’s the trailer:
THE MOVIE CAST is loaded with awesome, talented actors, some that you’ve no doubt seen or heard of. Here’s a partial listing of the Top Cast from IMDB, and below it I’ve listed some shows they have starred in that might sound familiar to you:
THE STORY is based on the beloved memoir of a Kansas homesteading family in the late 1800s. I read the book more than 15 years ago, and loved it. I was thrilled when I learned it would be made into a movie, and then couldn’t believe I was lucky enough to be invited to assist with costumes. Click on either of the book images to be taken to the book on Amazon. The one on the left is the paperback; the right is the Kindle version.
THE MOVIE PREMIERE was held back on March 28, in Wichita, KS, to a packed house, with a line down the street to get in. Then it started a nationwide theater run on April 18. It is still showing in a few select theaters. Next comes streaming, I’m told. It comes up in a search of streaming sites, but no availability date is given yet.
The famous cast members I listed above are only a handful of the sheer army of professionals who worked on this movie. And I do mean professionals; talented and accomplished in their respective fields. Many are local or regionally known celebrities, and many are ‘unknown’ experts in their field. It was a large, complicated coordination effort. It was a privilege to work among them, and see up close how all of the moving parts come together.
Below is my series of posts about working on the movie. It doesn’t seem like it was 2 years ago. I hope I’ll get the chance to work on another one someday.
[UPDATE 7/17/23: The project is back on! Whew! The director and management got approval from SAG to proceed during the strike. Whew!]
Original post:
Add this to the list of things I never thought I’d be saying one day: The SAG-AFTRA strike has shut down the movie I’m working on this summer. That is the current update on this project I’ve been so excited about. The law junkie in me wants to know how an organization (SAG) can enter a formal agreement for a movie project, knowing in less than a month, it is going to essentially pull the rug out from under the project by prohibiting its members from reporting for work. It happened quickly. One day I was splitting my time between the wardrobe room where I helped fit, repair and modify historical costumes; and …
… standing by on the movie set with sewing items in hand for quick fixes.
Then the next morning I woke to network news stories about the SAG-AFTRA strike. There were video clips of Hollywood A-Listers coming out to support ‘the cause’. When I arrived at our little set, they called all of us into a meeting, and the director told us the project was on hold. The room was full of stunned workers and volunteers of all ages. One of the producers led a prayer. It was that kind of emotion. There were sniffles all around the room. Now we wait.
The thing is, I support in general what unions are supposed to accomplish for their workers. But the collateral damage, wowza. Don’t get me started. Anyway, I hope my next update will be that the project has been given the go-ahead to proceed in spite of the strike. And hopefully that will be coming soon; as soon as this week.
It’s been a week of finishing garments for the start of filming. Filming is now underway.
Over the weekend, we re-created the lady’s outfit in this picture. More about this scene in a future post.
Later this week I will assist with fitting and readying actors and extras in their costumes for a scene portraying a gathering of people. I’ll also be one of the extras, wearing this 2-piece 1870s homestead dress. I’ve spent the past two days getting my dress finished and fitted. Below is what it looks like now, and the ‘before’ picture for reference. The lace tie will become a detachable collar. Once that’s done, I’m pronouncing the outfit complete.
Below is a close up of the fabric and lace.
Meanwhile, a new Wes Anderson movie was released in theaters last Friday. I’m hoping to go see it tonight. It will be full of Wes Anderson-style scenes to feast the eyes on. Hopefully the story is excellent too, but I plan to enjoy it regardless.
There on the floor in the corner of the secondhand fabric store, was that tell-tale red handle sticking up, like a unicorn. It’s a 1977 Bernina Nova 900.
This is the machine I used to swoon over in the sewing shops in the 1980s, when I was young and working my way through school. Cute, stylish, and not as expensive as the now-iconic Bernina 830.
It has a wrap-around case that also serves as a toolbox, with a holding place for each of the tools and accessories in plain sight.
The Nova has this adorable round foot pedal that is actually a very useful design. You can step on it from any angle, without having to make sure it’s lined up a certain direction under your foot.
It came with the basic stitches, and a few decorative ones.
Like most vintage Berninas, this model has a capacitor that can eventually go bad; although this one is still working fine. If/when it does go bad, it’s a $10 fix with a new capacitor, a tiny bit of solder and a soldering iron. The tutorials are out there.
[Screenshot]
I tested out the Nova on some of the historical sewing I’m doing for my Summer movie gig. The machine works flawlessly.
Summer gig update!
It’s been an adventure, sourcing fabrics and coming up with authentic designs for the late 1800s. I’ve constructed several garments for the 1870s-80s time period, They are unfinished until fittings can be done.
The nightshirt I was cutting out in the prior post is ready for fitting. This is one of the garments for the male lead.
This will be one of my outfits as an ‘extra’.
This is the start of a dress for another actor.
I’m using this pattern for the dresses, although I’m modifying the dress into two pieces–top and skirt. I’m also eliminating the ruffles. It is an excellent pattern to work with. It’s from the long-established Past Patterns company (pastpatterns.com).
The first scene where I’ll be an extra and the dresses will be worn, will be filmed later this month. Stay tuned!
School is out for the summer (yay!), and now the extracurricular fun begins. I’ve been asked to assist with costuming for a historical movie being filmed this summer! There are some details I can’t reveal yet. I badly want to reveal the title, location and more, but all in good time. The movie is based on a book I read about 15 years ago. I absolutely loved the book. This is a SAG (Screen Actors Guild) production, with several familiar actors from other movies and TV shows. I can also say that my first ‘assignment’ is to construct an 1800s men’s nightshirt.
The nightshirt needs to look something like this, but mid-calf length (image from ebay):
Where to come up with a pattern: I had this vintage pattern from when I made my brother a button-down oxford shirt for his high school graduation. The pattern size is too small for the actor, and not right in the sleeve and several other aspects, but it is close enough to give me guidance for neckband, shoulders and sleeve dimensions.
Click on the picture to go to the site where it can be purchased. (No affiliation with my site.)
The fabric is unbleached muslin, prewashed and tumble-dried to be soft.
More assignments and details will be shared as I am able.
And now for some New Music!
A show that I love, Ted Lasso, is about to wrap up it’s 3rd and reported final season. I didn’t provide a link, because I don’t advise starting to watch at the end, or reading articles about it. Just start at the beginning and take the journey. It will be the ultimate binge, I promise. The final episode will be released this week on Wednesday, May 31. This past week, the second-to-last episode ended with the premiere of this wonderful new song by Sam Ryder, featuring Brian May (of Queen). I’d say it has set things up perfectly for an emotional finale.
Happy Spring Break! August 31 was my last blog post until now, because that’s when the school year started. That matters this year because I am substitute teaching this year. Sound awful? It’s not. I’m having a blast. It was the break I needed from my office/home office job. I put myself on a self-imposed sabbatical from my regular ‘day job’, and am very happy with my choice.
Of course, a few days have been nightmarish. I’m now afraid of 2nd graders. 😉
When this school year started, most of the students had not been in a formal classroom since spring break of 2020, when the pandemic shut down schools everywhere. For 2nd graders, that meant they hadn’t been in a classroom since Kindergarten. For 5th graders, which is the age group I started the year with, they hadn’t been in a classroom since 3rd grade. In other words, there was an extended period of easing in of the classroom structure, behavior requirements and expectations. The expectation to ‘sit down at your desk and be quiet and listen’, had been long forgotten. The classroom settings needed other options. I was inspired to see how some teachers arranged their classrooms, with diffused or dimmed lighting, curtain panels to separate sitting areas, and floor seating pads, to make calming and comfortable environments.
Since those first two months, I’ve spent most of my days in high school FACS (fka Home Economics) classes. It’s as enjoyable and rewarding as when I was a full-time salaried teacher for those first few years after college. I consider this subject matter to be ‘survival skills’, and I approach it that way in the classroom, and I feel that teaching it is important work.
There is a dire shortage of substitute teachers in public school. That is in part because of the pandemic, but also probably because substituting pays a wage similar to the fast food sector, with no insurance or other benefits. If school gets cancelled for snow or other cause, substitutes don’t get paid; not even those of us who had already committed to a sub job for that day.
On the positive side, a substitute can generally choose what days to work. You can choose your job day-by-day. And because of the sub shortage, there are a lot of jobs to choose from each day. You don’t have to work days you don’t want to. I’ve worked every school day but two this year. I didn’t expect to work every single day, but was having fun from the start, so it’s been an easy choice to keep going. I now have my favorite schools in the district, where I enjoy working the most, and where I look first for sub jobs.
In Kansas, the substitute shortage is so dire this year that they relaxed the requirements. You are now eligible to apply for a substitute teaching license if you are 18 and have a high school diploma. Normally, the requirement is a minimum of 60 college credit hours.
This is what I’ve been helping sewing classes to make: Pajama pants, a hooded wrap robe/cardigan, and hand-sewn plushies. All are free downloadable patterns and instructions. Pattern websites below:
Here’s the pattern. It was published in the Kansas City Star on August 31, 1932.
What makes this pattern special? My grandma designed it…when she was 12. She sent it in to the Kansas City Star newspaper, who published it in their weekly quilt pattern series. Not knowing her age, they attributed it to her with ‘Mrs.’ before her name. That famous KC Star quilt series ran from 1928 to 1961. You can read more about it here. More information and a partial list of all of the KC Star patterns can be found here.
In 1986, the KC Star did a feature page on their quilt series, featuring The Purple Cross in their images.
Here is how the Purple Cross block can look in various quilt configurations. The diamond configuration was the first one I made. That is me and Grandma holding it.
This
Here’s a close-up of a kaleidoscope block.
Myrtle the dog stresses the importance of testing works in progress, and proper use of finished quilts.
This was the grandma who taught me to sew really well, on her dream machine, the Singer 401a Slant-O-Matic, that I now have care of, until it’s time to pass it on to the next generation.
The Purple Cross pattern is difficult. It starts out easy, when making the stars. But when you add the circle inserts it gets more complicated, and then the corners make it even more difficult. And then when sewing the blocks together I literally almost give up completely, feeling like I really don’t know how to sew at all! It would be slightly easier to construct if sashing strips are added between the blocks. As you can see from the examples above, I haven’t done that. I like the look of the blocks right next to each other.
So anyway, Happy Birthday to Grandma’s Purple Cross Quilt Pattern! Looking forward to making more of these quilts.
And now for some music!
The Slicethelife.com song draft continues, and is now on Round 5. The Run-Sew-Read.com round 5 selection will be this weekend. What will it be? I’m still deciding. A listing of the songs in the first four rounds can be viewed here.
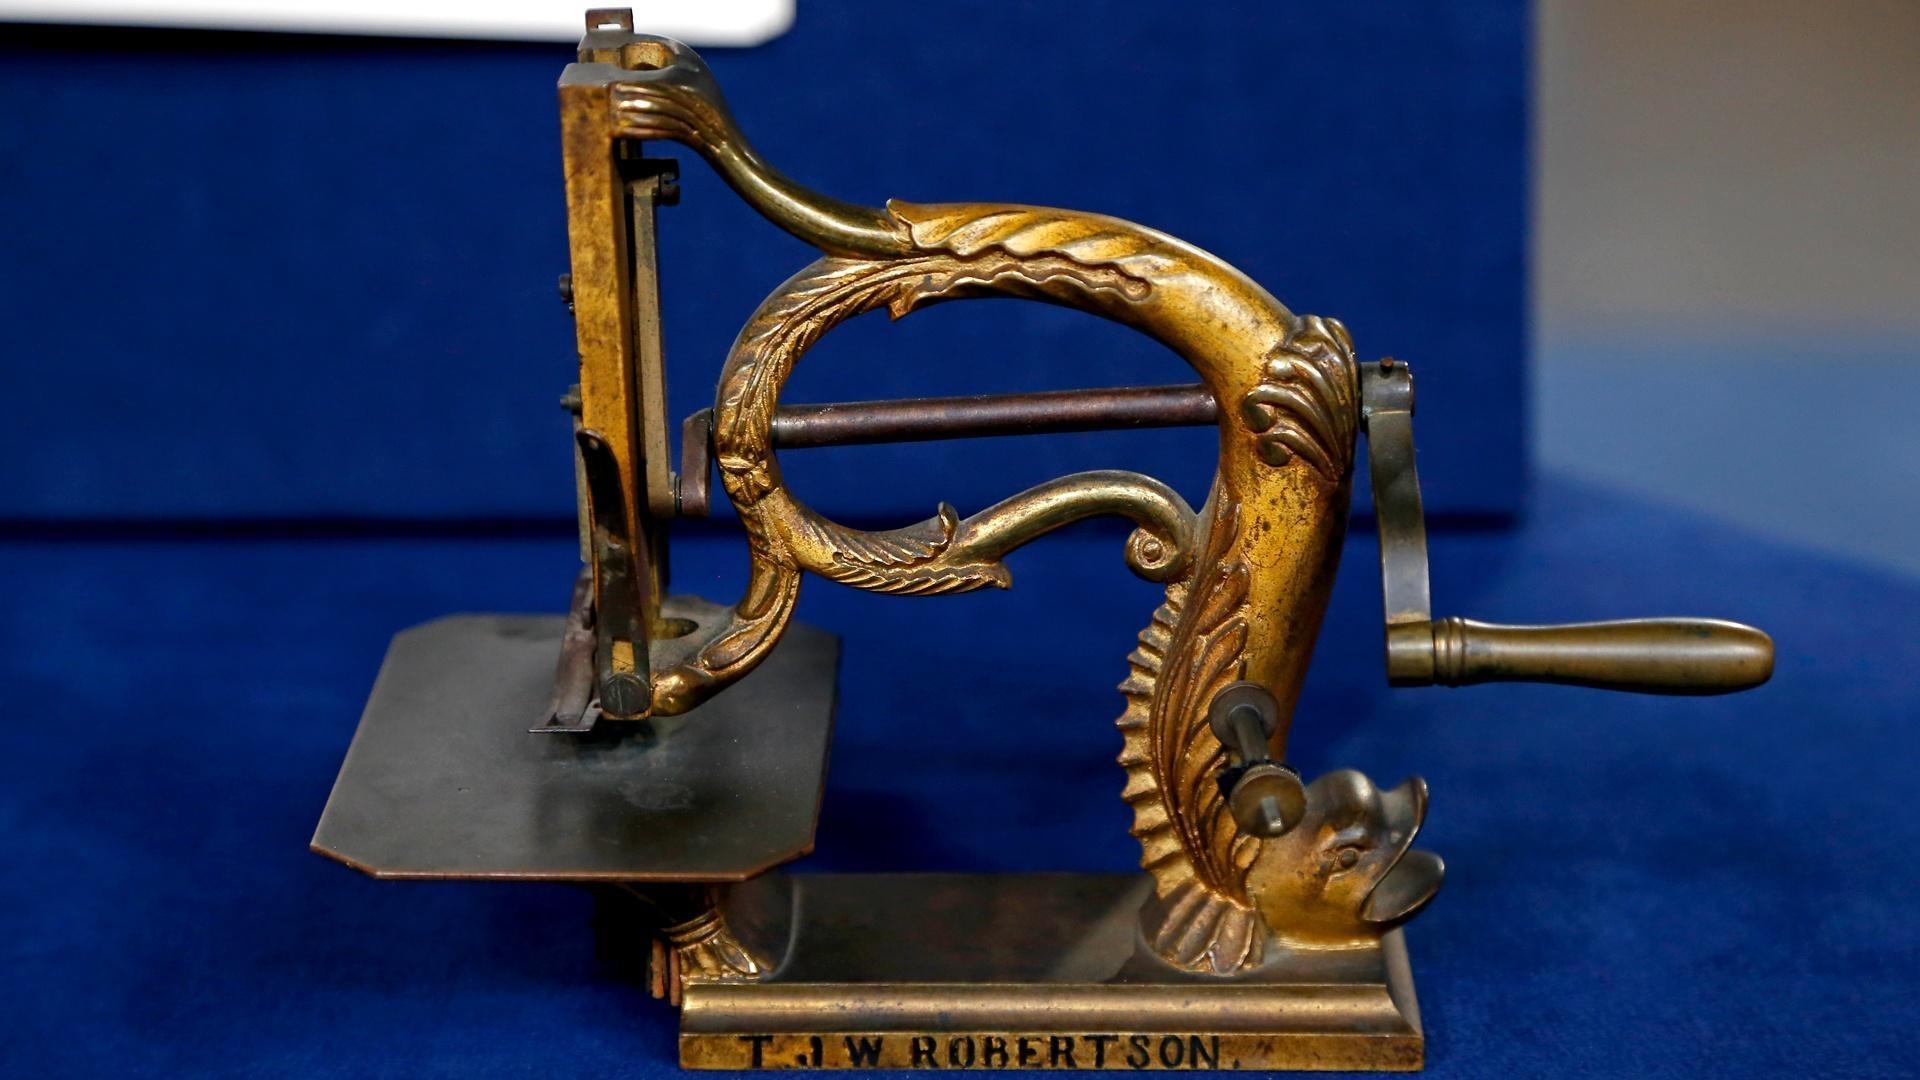
For us sewing enthusiasts, isn’t every day ‘Sewing Machine Day’? Of course it is! I didn’t know until today that sewing machines have their own day. This article on PBS.org tipped me off. It’s a neat collection of sewing stories they’ve done over the years. (Click on this photo to view the story of this pretty old machine on Antiques Roadshow.)
I’ve done a few blog posts profiling my machines, and have more still to profile. Here are the stories I’ve told so far:
This was my grandma’s 1958 Singer 401A, that I learned lots of sewing skills on at her house.
This was my first antique sewing machine purchase; a 1917 Singer 66k hand crank, manufactured in Clydebank, Scotland. Still one of my most precious machines. The blog post: This machine is a sewing ambassador.
The two below are my ‘modern’ machines. It’s hard to believe the Bernina 930 is about 35 years old. I’ll never want for anything more modern. This will likely always be my main machine. The serger/overlocker is my newest machine. Five years after its purchase, I still have a love/hate (mostly hate) relationship with it. (Future blog post coming on that.) But it does serve a purpose.
In future posts from time to time, I’ll continue to profile my machines one by one. There are a couple more Berninas, and the rest are vintage Singers. There’s a Featherweight, another beautiful hand crank machine, and more treadle machines. Each one is different and special, at least to me.
Which is better, new machine vs vintage? The debate will continue to rage on about whether modern machines are better than vintage, and whether to go computerized or mechanical. You can see where I come down on those issues. I love sewing with my old machines, and I love that if something malfunctions, I’ll probably be able to fix it myself.
Yes, you can restore an old Singer yourself. If you’ve wanted one of the old black Singer machines, don’t be afraid to buy one you see at a good price. Use the serial number to date the machine. The site http://ismacs.net/has a great database of sewing machine manufacture dates, and a collection of manuals, photos, etc. The parts for the machines are still made, and the machines are quite simple mechanically. Some cleaning, oil and minor adjustments may be all that’s needed. You can buy the bobbins, needles, belts, etc. at a sewing store, some discount stores, or online. Youtube has many excellent videos on how to do the cleaning, oiling, adjusting and repairs if needed. If you find an old machine at a great price, give it a shot.