I ate the one in my hand, and it was ‘delicious’. The rest of the batch I picked are to be peeled, sliced and dehydrated.
My tree is four years old. The first three years I got a few apples. This year I got a bounty.
The dehydrating process is simple: Peel, core and slice the apples, rinse or soak the slices with a Fruit Fresh (citric acid) and water mixture, lay the slices on the dehydrator trays, and run the dehydrator for several hours.
The capacity of my little dehydrator is about 15 sliced apples, which means I’ll have to dehydrate my apple harvest in several batches.
Back on May 20, the branches were laden with these bunches of little apples. It was painfully hard to thin them out and let the weaker ones drop. I wanted to keep them all. But that’s part of the process. I’ve been rewarded with a nice haul of ripe apples, and more still on the tree to pick later on.
In a week or two, after I’ve finished dehydrating the first haul, I’ll pick the rest and dehydrate them, and close the chapter on the 2021 apple harvest.
About my apple tree: It has three varieties spliced into one tree. Because of that, I don’t need two apple trees in the yard to cross-pollinate each other. The one tree produces fruit all by itself. It was a budget purchase from the home improvement store, during their annual Spring 2-for-1 tree sale. It was small enough that I dug the hole for it myself with little effort. Four years later, it’s the size of a large bush; with apples as high as 7 feet from the ground. A manageable size.
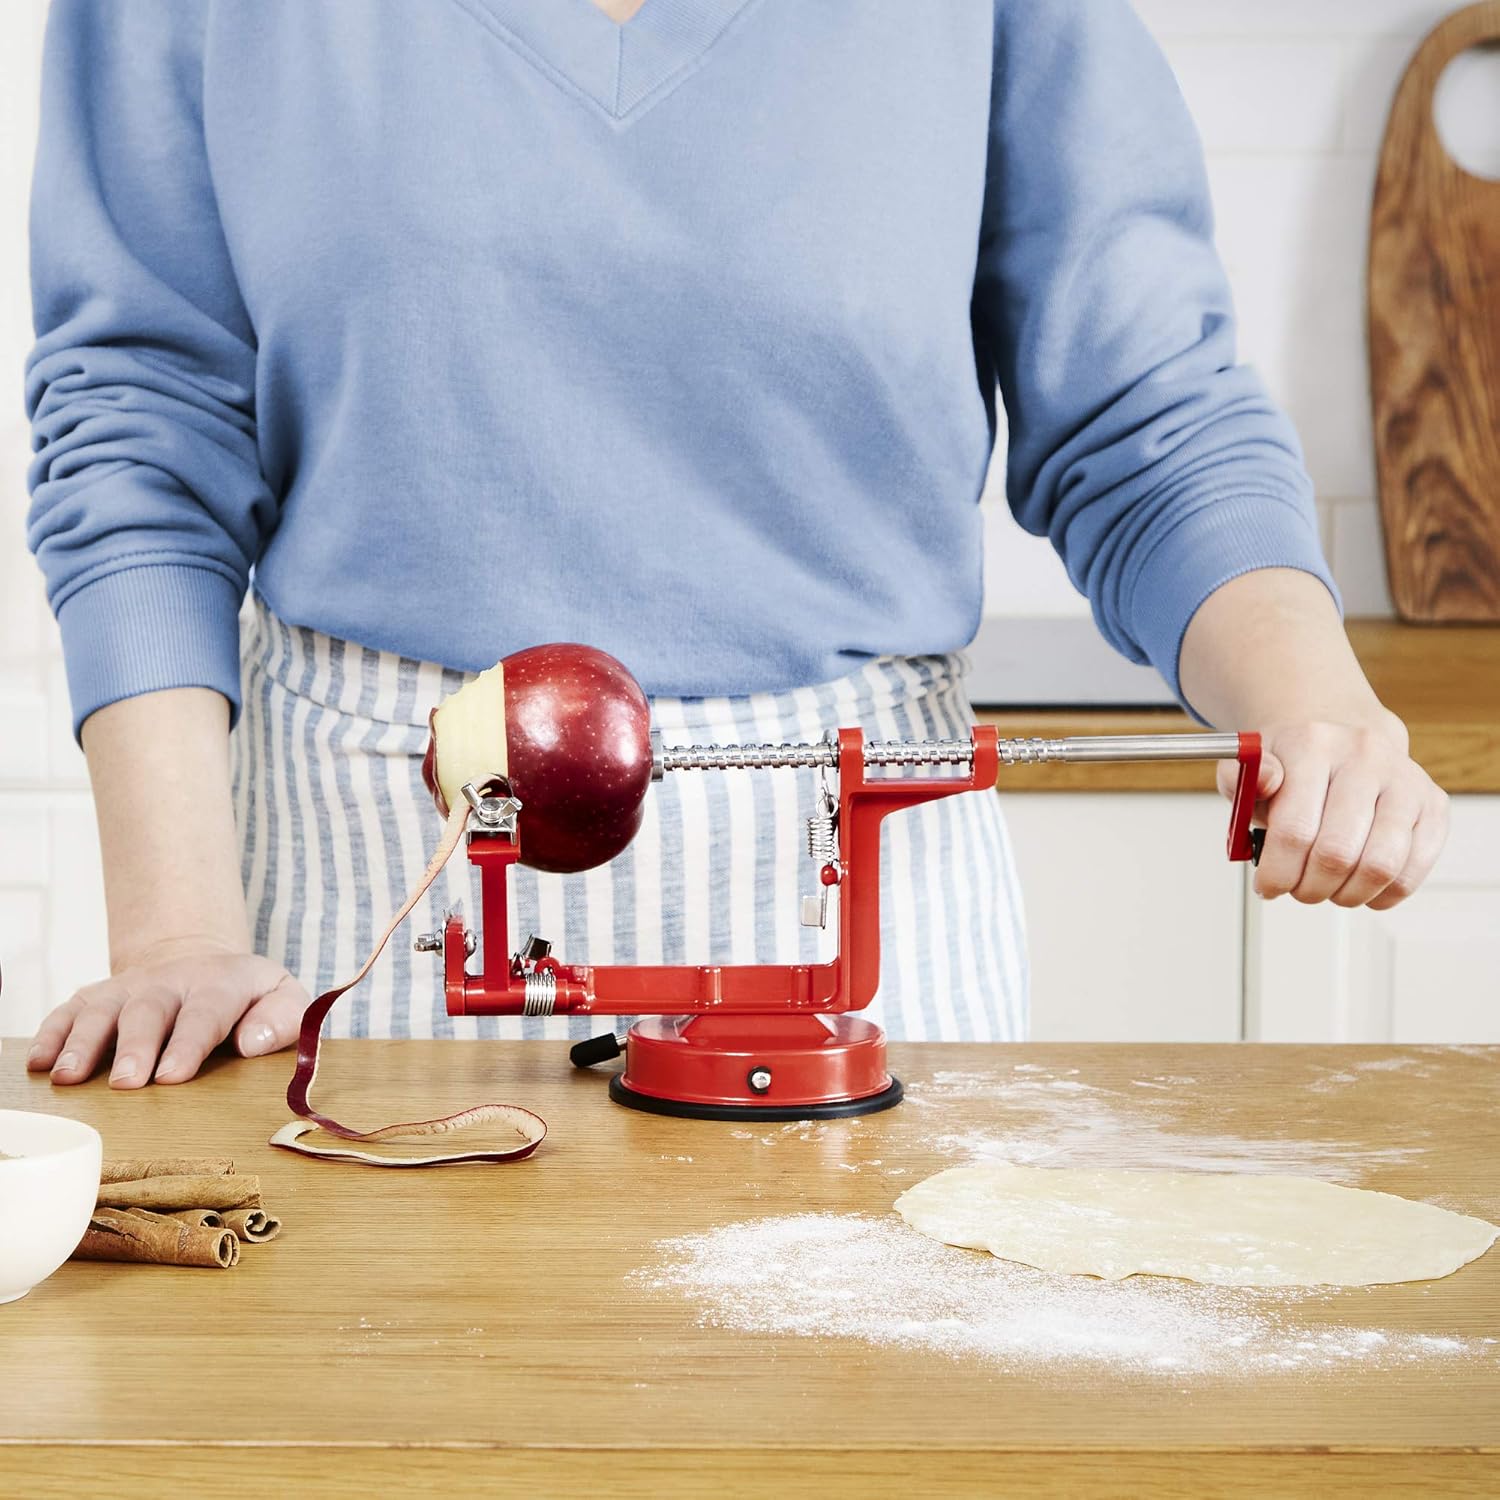
Side note about apple peelers: If you’ve never tried one of the red hand-crank apple peelers, and are skeptical about whether they work, I can say that they do work and I don’t want to be without one. They make quick work of slicing a large bunch of apples. Mine is low-end, purchased for $10 from the now-defunct Kitchen Collection stores. (I still miss Kitchen Collection stores!) I’m satisfied with the job my bargain version does. I’m guessing higher end versions attach more securely to the counter, or are made of higher quality metal, maybe? Just guessing. I’ve never tried one other than my own. Here’s one on Amazon that looks much like it. https://amzn.to/2WJcYJE (affiliate link)
Image from Amazon
Using the peels and cores: The apple cores and peels are not going to waste. I’m making Apple Scrap Vinegar. All it takes is the peels and cores, about 2 tablespoons of sugar per dozen apples, and some water. Let it ferment in a jar and you’ll have a handy vinegar with a nice apple scent. I use mine in laundry and some bathroom and kitchen cleaning. Full instructions for Apple Scrap Vinegar are here on this superb blog. https://zerowastechef.com/2014/10/30/apple-scrap-vinegar/
Switching gears from apples to music,… how about a song draft? I’m one of 13 participants in a 10-round song draft. My first two selections are here.
But enough about my selections. We are two rounds into the draft, and what’s developing is a wonderful, diverse playlist. You can see all 26 of the selections so far here:
Step 1: Rinse the cabbage head and remove the outer leaves. (Don’t discard the outer leaves. They will be used in the jar.)
Step 2: Quarter the cabbage head, remove the dense middle, and slice the quarters into thin shreds, 1/8 to 1/4 ” wide.
Step 3: Sprinkle the salt on the sliced cabbage and knead or scrunch it until the cabbage feels a bit wet and wilted.
Step 4: Stuff the cabbage into a jar, and compact it. Those big outer cabbage leaves you set aside can be used now, to cover the cabbage. Then put a small jar or weight on top of the leaves, and then loosely put a lid or fabric cover over the jar. Don’t seal the jar shut, because pressure will build up.
Then wait, one to four weeks, depending on how strong of a sauerkraut taste you want.
MORE ABOUT THE PROCESS AND TIPS IN PICTURES:
Slicing the cabbage:
This can be done with a big knife or a mandolin slicer. I used a mandolin slicer, which had the cabbage in shreds in no time. My mandolin slicer is the low-end in price and features, but has served me well for over 10 years. Pictures below. Here’s a link to one on Amazon that looks very similar. https://amzn.to/3htT9OA
The slicer comes with a safety warning from me. I have twice tried to cut off the end of my finger while slicing cabbage. I should have been wearing my cut-resistant safety glove.
Post slicing band-aid
The safety glove to put on before the finger cut, not after.
The slicer comes with a pusher to keep hands away from the blade, but it doesn’t work well with cabbage. Some mandolin slicers actually come with a glove. Here’s an example on Amazon: https://amzn.to/3olbqPu
Image from Amazon
Image from Amazon
The scrunching/kneading process:
Once you have your pile of sliced cabbage, sprinkle the salt over it, and knead or scrunch it until the cabbage feels somewhat wet, heavy and wilted. I sliced and kneaded one head of cabbage at a time, because that is the limit of my space and equipment. Here’s a before and after picture of the cabbage. I used a paella pan for the scrunch/knead process, which works great because it’s big and wide, with sides to keep the cabbage from falling on the counter or floor.
Before the scrunch/kneading
After
Use a big-enough jar for fermenting:
You need some extra room at the top for the liquid to expand during the fermenting stage. For three heads of cabbage, a wide-mouth gallon jar worked well. For one head of cabbage, I used a quart-size mason jar. The one time I filled a jar to the top with cabbage, the liquid expanded during fermenting, and oozed out the top. I lost valuable liquid needed for the sauerkraut.
This picture below shows the packed shredded cabbage, covered with a layer of the outer leaves, and a small empty jar on top, that is being pressed down by the gallon jar lid. The lid on the gallon jar is not tightened. It is kept loose enough for air to escape.
What to watch for during fermenting:
In a day or two, you’ll see the liquid becoming more prominent, and then some bubbles will appear around the top. It’s working. You can periodically open the jar to push the cabbage further down, stir it, rearrange the cover leaves and weight on top. I haven’t done much in the way of stirring, but did push the cabbage down to keep it submerged in the liquid.
The green color will gradually turn to pale yellow. You’ll notice it by the end of the first week:
Day 1 color
Day 7 color
The sauerkraut taste will become stronger with each week the cabbage ferments. There will be a slight sauerkraut taste after week 1, and by week 4 it is really tasting like sauerkraut.
The salt measurement is approximate.
The amount of salt called for can vary quite a bit in recipes. I added more salt in one batch, and it did change the taste, but didn’t ruin it for me. The amount of salt and taste will be a subjective thing for you.
Storage and shelf life.
What is the shelf life of homemade sauerkraut, and how is it best stored? I don’t know yet, because I keep eating it all! The taste is quite nice.
Nutritional information (for a head of cabbage and tsp of salt):
For one head of green cabbage
For one teaspoon of table salt
Is there something familiar about this face and voice? It’s actress Elizaeth McGovern (Lady Grantham on Downton Abbey), and her band.
The links in this post may be ‘affiliate links’, meaning when one is clicked and a purchase is made, I may get a small commission from Amazon. The commission will help offset what I pay to keep my site free of ads.
Happy Pancake Day!!! In 2019 I wrote the blog post below about the annual Pancake Day race competition between Liberal, Kansas USA and Olney, England. They’ve been holding the annual trans-Atlantic race for more than 70 years. I swore I’d try to attend the Liberal KS Pancake Day race in 2020. Then it was cancelled for the then-new Covid-19 pandemic. Now it’s 2021 and the event had to be cancelled for a second year for the pandemic. So here I am looking back at the events and vowing to get there in 2022. Have a lovely day, and maybe some pancakes. (US and UK pancake recipes are at the bottom of the post.)
(The original post from 2019)
They say it started more than 500 years ago, when on Shrove Tuesday (the day before the start of Lent), a housewife in England was cooking at her stove, heard the bell for church, and dashed from her house to the church still wearing her apron and carrying her skillet.
Today it is an annual international women’s race, in which the participants wear a housedress, headscarf and apron, and must carry a skillet with a pancake in it, and flip the pancake.
The event takes place in Olney, England and Liberal, Kansas USA. Each town holds a race, and the fastest finish time wins the international contest.
(Picture from Olney’s website)
A multi-day festival has grown up around the event. Each town maintains a Pancake Day website; and each maintains a Facebook page, which is great for enthusiasts like me who want real-time updates on race day.
How the International Pancake Day Race came about:
Each of the two cities’ websites gives a brief history of the Pancake Day Race. Since each site provides a fact or two that the other one doesn’t, I’ve included both. But hey, the best thing to do is visit both websites for more history and photos of past events.
From the Liberal, KS site:
“In Olney, England, the Pancake Race tradition dates back more than 500 years to 1445. A woman engrossed in using up cooking fats (forbidden during Lent) was making pancakes. Hearing the church bells ring calling everyone to the shriving service, she grabbed her head scarf (required in church) and ran to the church, skillet and pancake in hand and still apron-clad. In following years, neighbors got into the act and it became a race to see who could reach the church first and collect a “Kiss of Peace” from the verger (bell-ringer.)
“HOW DID PANCAKE DAY GET STARTED IN THE UNITED STATES?
“It all started in 1950 from a magazine picture of the Olney women racing each other to the church. Liberal Jaycee President R.J. Leete contacted the Rev. Ronald Collins, Vicar of St. Peter and St. Paul’s church in Olney, challenging their women to race against women of Liberal. Like in Olney, the traditional prize of the race is the “Kiss of Peace” from the verger (bellringer).”
From the Olney, UK site:
“No one is quite certain how the world famous Pancake Race at Olney originated. One story tells of a harassed housewife, hearing the shriving bell, dashing to the Church still clutching her frying pan containing a pancake. Another tells that the gift of pancakes may have been a bribe to the Ringer, or Sexton that he might ring the bell sooner; for ringing the bell signalled the beginning of the day’s holiday and enjoyment, no less than to summon the people to the service at which they would be shriven of their sins before the long Lenten feast.
“Tradition declares that the race was first run in the year 1445, pancakes at the time being a popular dish, receiving royal favour. It was run on Shrove Tuesday, the day before Lent, and the whole day was given over to a festival of celebration, pranks and pastimes. It is not known where the original start line was but the finish line was at the Church door.
“The race continued through the centuries, and whilst many other local customs died, and the race itself may have lapsed many times, such lapses never caused the race to be entirely forgotten by the womenfolk of Olney. It is known to have taken place during the troublesome times of The War of the Roses (1445 to 1487).
“THE CUSTOM REVIVED
“After a lapse during the Second World War, it was revived again in 1948 by the Vicar of Olney the Reverend Canon Ronald Collins. In clearing out a cupboard he came across some old photographs, which had obviously been taken in the Nineteen Twenties and Thirties of women running with frying pans. Filled with enthusiasm to revive the ancient custom, he called for volunteers, and in response thirteen runners appeared on Shrove Tuesday that year. The race immediately caught the popular imagination and people of Olney set out to enjoy this simple and colourful link with their rich past, a day of festivities.
“THE LINK WITH LIBERAL
“In 1950 the race became an International event. A challenge was received from the town of Liberal in Kansas, USA, where they had, after seeing the press photographs of the race at Olney, conceived the idea of setting up a similar custom. Olney readily accepted the challenge and, in a spirit of international goodwill and friendship, the two towns now compete annually and prizes are exchanged. The race is run on a timed basis.”
THE RACE!
At 11:55 am Olney time (5:55am Central US time), the Olney Race begins.
At 11:55 am Liberal time (5:55pm Olney UK time), the Liberal race begins.
The (updated)weather forecast for today (February 16, 2021) at what would have been race time:
Olney: Partly cloudy and 50°F with a SW wind of 13 mph, causing a feels-like temp of 45°F.
Liberal: Cloudy and -6°F with a SE wind of 15 mph, causing a feels-like temp of -18°F.
Don’t be fooled by the dresses, aprons and skillets; these races are legit athletic contests. So, what is the actual race like? Here is a recent video from each side of the pond:
The Olney, UK race (2012)
The Liberal, KS USA race (2014)
Attending these two Pancake Day races is a bucket list item for me. It’s only a 3.5 hour drive for me to Liberal, KS, but Tuesdays pose a problem. Once again this year, work has intervened to keep me from going. Next year, Pancake Day is on Tuesday, February 25. I shall try again.
I love to eat pancakes, so pancakes must be included in this story:
American pancakes are typically thicker than English pancakes. I love both.
I love pancakes so much that on my first ever trip to England (in 2010), I took a picture of my first-ever English pancake, and the lovely, skilled vendor cook who made it for me.
No matter how long I’ve kept a jar of yeast, it has never gone bad. Until now. Just two months ago, I wrote about DIY bread mixes; and wrote that ‘yeast keeps well past its sell-by date’. Turns out, that very yeast was going bad as I was writing the post. The bread made and pictured in that post turned out fine. But in the weeks that followed, one of those mixes turned out like the one pictured on the left below. I tried another loaf from the same set of mixes; got the same result. So I tried one more loaf, but added 1/2 teaspoon of yeast from a new jar, and got the result on the right.
The old yeast still has not reached the sell-by date on the jar, and has been stored continuously in the frig, but for some unknown reason it went bad anyway. These things happen, I guess. I stand by my advice to buy and keep a jar of yeast on hand. I’ve baked bread since I was a little girl, and this is the first time I’ve ever had yeast go bad.
The short loaves didn’t go to waste. They sliced and tasted fine, but a bit more dense than a regular loaf.
More desert island music
We are into the final three rounds of the Slice The Life 2020 Album Draft. Round 8 has just begun. For the latest ‘desert island album’ picks, click here.
For the latest Run-Sew-Read pick, click here, and enjoy the sample below.
After years of ‘window shopping’ for a grain mill, I finally have my very own, and am grinding my own whole wheat flour, since last December.
THE GRAIN MILL
This is the grain mill model I purchased. It grinds up to 700g of berries per batch. 700g is about 4 cups of wheat berries, which makes 5-6 cups of flour.
The bottom section of the grain mill is the powerful motor, and the upper compartment holds the grain and the blade. The appliance is heavier than it looks. On the back of the appliance there’s a handy red handle to use in pouring the flour out.
THE WHEAT
Where to buy:
Wheat berries can be purchased by the pound here, at a local feed & seed store. I most recently paid 75 cents/pound. Wheat berries can also be purchased at some natural food stores, or ordered online. Here are a couple of options on Amazon:
I inquired with our local extension office about clean and safe preparation and use of wheat berries purchased from a feed & seed store. Their instructions were:
Use hard wheat; not the soft variety;
The wheat should be dry. Don’t wash it, because that will soften it, which will make it unsuitable for grinding.
Freeze the wheat berries for a couple of days, to kill the things that take up residence in growing wheat. (There’s a great discussion about those little ‘things’ here. In other words, don’t be grossed out about what’s in wheat; just follow the steps from the extension office.)
Sift the wheat berries with a wire mesh strainer, to remove dust and the things that got killed in the freezing process.
Eat only cooked or baked foods made with the wheat; nothing raw. (Translation: This is one of the reasons you’re not supposed to eat raw cookie dough. Sorry kids; this bums me out too.)
The standard food handling rule applies: Wash your hands before and after handling the wheat berries.
THE GRINDING PROCESS
Measure the wheat berries, sift, and then pour the berries into the mill.
Measure
Sift
Put berries in mill
Grind for about 5 minutes. The grinding compartment and wheat get very hot, so I run the mill for one minute at a time; letting it cool for a few minutes between each minute of grinding.
Here is what the flour looks like after 1 minute of grinding and again after 5 minutes. The two pictures might not look all that different, but they feel different to the touch. After 1 minute, the texture is a little bit grainy, like a very fine sand. After 5 minutes it is a soft powder.
After 1 minute of grinding
After 5 minutes of grinding
The flour will have more volume than the berries. Two cups of wheat berries will produce around 3 cups of flour.
STORAGE AND SHELF LIFE
Wheat berries have a years-long shelf life. You can buy and store wheat berries in bulk, without fear of them going bad. I’ve stored them for years in a dark cabinet in an airtight container. I noticed no change in taste, smell or texture.
After grinding, the whole wheat flour should be stored in the frig and used within about 3 months. I grind my berries on an as-needed basis, and keep a cup or less of the flour on hand in the frig. King Arthur Flour recommends storing whole wheat flour in the freezer. https://shop.kingarthurbaking.com/items/king-arthur-premium-100-whole-wheat-flour-5-lb
Is it necessary to use a mill to make flour? Probably yes. I’ve tried grinding wheat berries in an electric coffee grinder. It produced tiny granules the consistency of fine sand, but did not make flour. The granules didn’t go to waste though. They were a super tasty addition to my oatmeal.
I’ve tried grinding wheat with a food processor, and no, it simply didn’t work.
BAKING WITH WHOLE WHEAT FLOUR
Whole wheat flour creates a more dense, flatter, heavier product. If you don’t want that, use a combination of wheat flour and all-purpose white flour. My general ratios:
In cookies, I use a ratio of 1 part whole wheat to 3 parts all-purpose flour. (1/4 c. w/w : 3/4 c. a/p)
In breads, I use a ratio of 1 part whole wheat to 2 parts all-purpose flour. (1/3 c. w/w : 2/3 c. a/p)
In my recent post about DIY make-ahead bread machine mixes I used 1/3 whole wheat flour from my mill. See that darker colored flour in the bottom of the jars? That’s the w/w flour. That combination gives some of the benefits of whole wheat, but not the flat, heavy loaf. It retains the lighter, fluffier texture from the white all-purpose flour.
HOW ABOUT SOME MUSIC?
The Slice The Life 2020 Album Draft continues. For the latest ‘desert island album’ picks, click here.
These bread mixes use six basic ingredients and cost only pennies per loaf. Having a mix ready to go makes the bread-making process super efficient and low-effort. A one-loaf mix fits perfectly in an 8oz instant coffee jar.
The tiny Tupperware cups hold the yeast, sugar and salt. (I use instant coffee in my mochas, so I end up with about three empty jars per year. If you don’t use instant coffee, try empty 30 oz mayo jars. )
The mix ingredients are: Flour, sugar, yeast, salt, margarine and powdered milk (not pictured).
I like to make up four to six mixes at a time.
Here are the finished mixes lined up in the back of my frig.
The breadmaking process goes from mix and liquid, to the bread pan in two steps, to a finished loaf. (Of course the top of this loaf caved in slightly, because I was planning to take a picture. Sigh. )
When the pandemic was declared, the store shelves were immediately emptied of bread; and yeast, flour and other baking staples. Thereafter, they were unavailable or in short supply. As a regular bread maker, I had a supply of yeast and flour on hand, plus some DIY bread mixes made up; and a couple of freshly-made loaves in the freezer. Never expecting a pandemic or grocery shortage, I’d considered that modest stockpile to merely be a convenience. But it ended up getting me through the the shortage.
In addition to the bread mixes, I try to keep an extra unopened 4 oz jar of yeast in the frig, and a spare bag (or 2) of flour in the freezer, plus however much is in my flour canister. Flour came back to the store shelves fairly quickly, but four months into the shortage, I was down to less than half a jar of yeast. This month, jars of yeast finally came back to the store shelves. Even if you don’t do a lot of baking, don’t be afraid to buy yeast by the jar, and don’t worry if you can’t use it up before the sell-by date. In my experience, it keeps well past its sell-by date.
Slicing made easy.
Do you dislike slicing a bread machine loaf as much as I do? The loaf shape is awful for slicing. To make the process happier: Cut the loaf into quarters, and then slice and use one quarter at a time. The other three quarters go in the freezer. When I need one from the freezer, it thaws in just a few minutes, or 30 seconds in the microwave.
My bread machine is this one, which has been discontinued, but there are still some models in the Amazon warehouse. I’ve never been picky about what features are on my bread machine. I’d probably be happy with any machine at any price.
Which ten music albums would you want with you when stranded on a desert island? Ten bloggers (me included), are participating in a 10-round desert island ‘album draft’. Round 2 is currently underway. All of the album draft bloggers except me are ‘proper’ music bloggers; and some are musicians as well.
The link below will take you to a listing of the draft picks so far. Check in now and from time to time over the next eight weeks, to see what albums have been drafted and why they were selected. Feel free to drop us a comment about the picks.
As masks have finally become plentiful, with enough supply to meet demand, my one-person mask making sweatshop is still operating, but I’ve slowed down production in order to indulge in more creativity. I’m using the same patterns as I was here and here, but have continued to experiment and add ‘improvements’ and improvisations.
I’m enjoying the process, and am grateful that I can do this one thing to help people navigate the pandemic. I’m inspired by all of the creative masks I see. Our community is under a mandatory mask order right now, and what I love most about it (besides the way it makes people keep each other safer) is looking at everyone’s masks. I love the vast array of prints and designs. Instead of people-watching, I’m now a mask-watcher.
My neighbor gave me a mask she made! I had given her a mask very early on. Then a few days after that, she came over asking where I got my pattern. Of course I printed her a copy to keep and use. Then one day she came over with this mask for me! She had worked her own details into it; filter pocket and good nose wire included. I love wearing it as much as I love my own. So, I say go exchange masks with fellow mask makers!
Another neighbor informed me that her mask was stolen from her car. So you’ve been warned, that the coolest masks have street value. Protect your valuables.
How long will we be making and wearing masks? I don’t know, but I just pulled fall and holiday woven cottons from my fabric storage, thinking I might as well get started on masks for the upcoming seasons.
And for some mask-making nourishment…
One big chocolate chip cookie… For the sheet cookie, I added an extra cup of flour; spread the dough on a 1/4 -size sheet, and baked 2 minutes longer than specified for drop cookies.
It was February 2011 when I tore this recipe from my Runners World magazine.
Nine years later, I finally decided to make it and see if it tastes as good as it looks. Answer: Yes it does.
For nine years, it kept falling out of my recipe book, and got stepped on, stained, torn; and almost tossed in the garbage numerous times. But then I’d look at the ingredients and again decide to hold onto it, since it looks easy and tasty, and not unhealthy.
Enter the coronavirus lockdown. I finally made the pudding. It uses normal ingredients. I didn’t need to make a trip to the store.
Ingredients List:
1/4 c. sugar
3 Tbsp. corn starch
2 tsp. instant coffee or espresso powder
1/2 tsp. ground cinnamon
pinch of salt
2 c. lowfat chocolate milk
2 oz. bittersweet chocolate, finely chopped
1 tsp. vanilla extract
Substitutions:
For the bittersweet chocolate squares, use 2 Tbsp. cacao or cocoa powder + 2 Tbsp. shortening.
For the chocolate milk, use 2 tsp. cacao or cocoa powder + 4 tsp. sugar + 2 c. skim white milk.
The pudding was indeed fast and easy to make.
It is very tasty. The coffee, chocolate and cinnamon flavors are all quite prominent. I think I’ve made it four times now; or maybe five.
The recipe makes four coffee cup-sized servings.
Here’s the online version of the recipe. It’s easier to read than my nine-year-old poorly-preserved cutout.
More things to savor. David Gilmour (of Pink Floyd) has released a brand new song. It has a Leonard Cohen influence. I’ve already lost count of how many times I’ve played it. Amazon download/purchase link.
David’s song is part of a book project by his wife, Polly Samson. It is about the island of Hydra, and Leonard Cohen’s time spent there. She recorded the audio book, and David is on that too. UK buyers can get the audio book now, I believe. We in the US have to wait until September. Sigh. The hardcover and paperback can be ordered in the US, but I want the audio book.
The Skillet section of Lifehacker.com has a regular ‘waffling’ feature, where different foods are put in the waffle iron. The waffled mac & cheese got my attention. My first attempt turned out like this. Some of the edges get crispy. It can almost be a hand-held snack, but I recommend eating it over a plate, as some of the noodles will probably come loose.
The recipe: I tried waffling two different mac and cheese recipes; both from allrecipes.com. One was this stovetop recipe, and the other was this baked version. The Lifehacker article recommends baked mac & cheese for waffling. However, for flavor I preferred the stovetop version.
The waffling process was simple: Put a scoop of cold mac & cheese on the preheated waffle iron; smash the lid closed and let the sizzling begin. Three (3) minutes in the waffler produced the best result for me. On removal, the mac and cheese doesn’t stick to the waffle iron, but I did have to gently coax it out; same as with a regular waffle.
Cleanup was a cinch. There was residue in the waffle iron, but it came out easily with a wipe down. Verdict: Highly recommend. Two thumbs up.
The rest of the leftovers were frozen on a cookie sheet, for future waffling.
There’s been another top notch lockdown music release! This one’s for Moody Blues fans.